
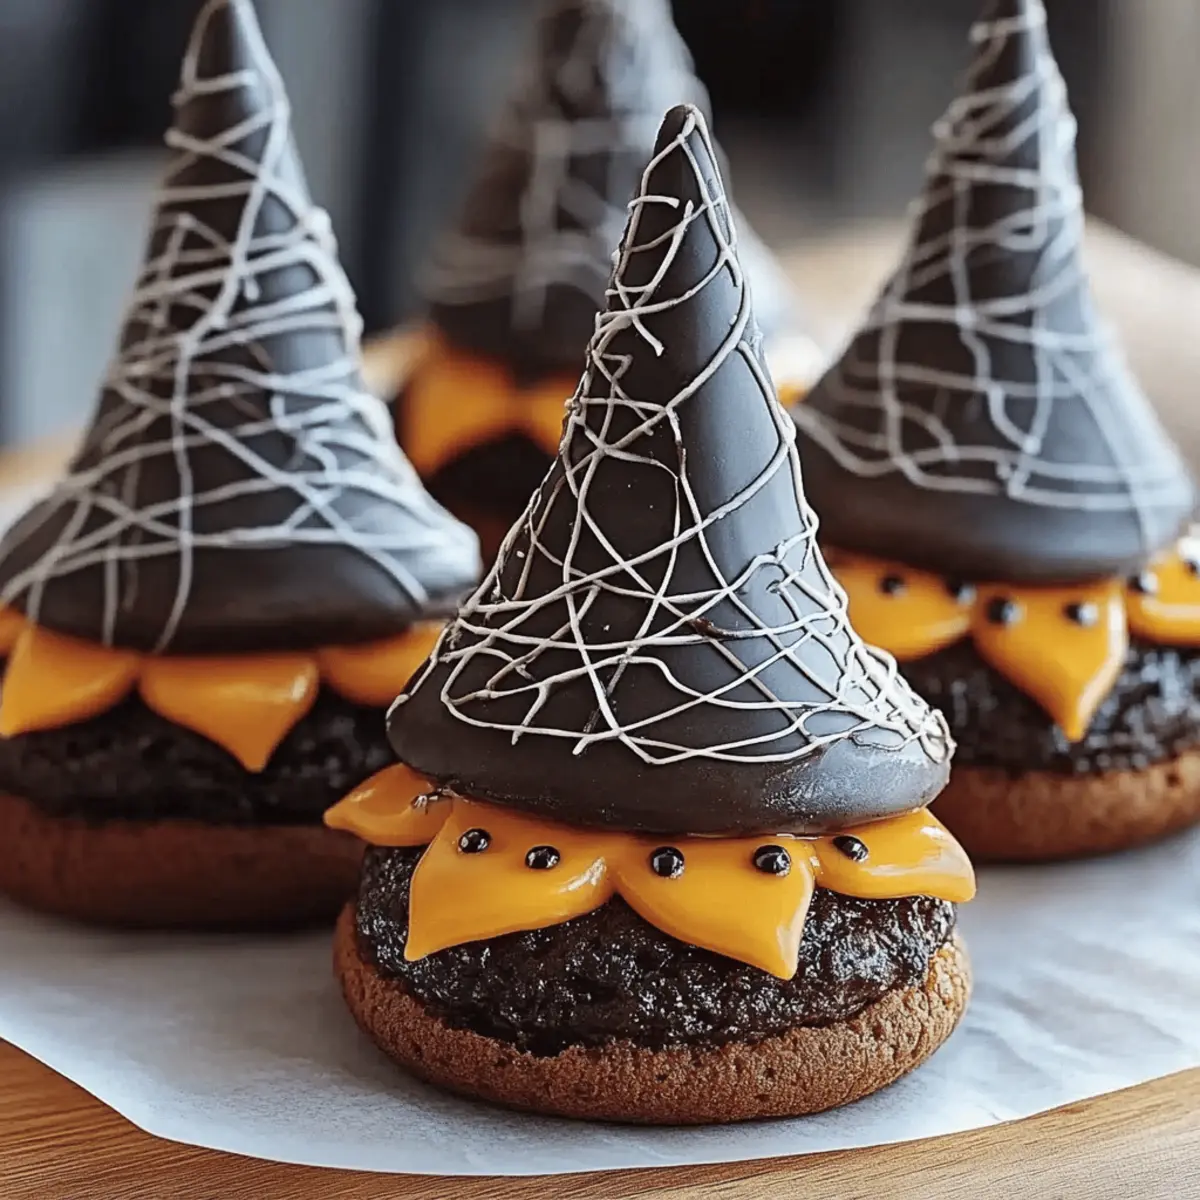
As the leaves turn and the air grows crisp, I find myself losing track of time in the kitchen, dreaming up festive treats. This year, I’m excited to share my Halloween Witch Hat Cookies, a whimsical addition to your holiday spread. These delectable confections are not only a delight to make—perfect for unleashing your creativity—but they also bring joy to everyone who sees (and tastes) them. Using a simple cake mix and some store-bought goodies, you can whip up these charming desserts in under an hour, making them a fantastic choice for busy days filled with spooky fun. Ready to conjure up some magic in your kitchen? Let’s dive into the hauntingly delicious details!
Why Are Halloween Witch Hat Cookies So Fun?
Spooky Creativity: These cookies are the perfect canvas to unleash your Halloween spirit, inviting you to decorate with colorful icing and clever designs.
Quick and Easy: With just a box of cake mix and a few simple ingredients, you can create these delightful treats in under an hour!
Kid-Friendly Fun: Involve the little ones in the decorating process, making it a memorable and enjoyable activity for the whole family.
Crowd-Pleaser: Whether it’s a Halloween party or a festive gathering, these cookies are sure to garner smiles and compliments from guests of all ages.
Versatile Decoration: Customize with your choice of icing colors for a unique touch that reflects your spooky style. For more festive ideas, check out these easy Halloween treats to complement your Halloween Witch Hat Cookies!
Halloween Witch Hat Cookies Ingredients
For the Cookies
• 1 box Favorite Cake Mix – Choose a flavor that your family loves for a delightful base!
• 24 Store Bought Chocolate Cookies – These serve as the base for your witch hats, adding a rich chocolatey flavor.
For the Hats
• 12 Sugar Cones – These will create the iconic witch hat shape; be gentle when handling!
For the Decorations
• 1 can Black Color Mist Food Coloring Spray – Use this to give your cones that spooky, witchy look!
• 1 cup Creamy White Decorator Icing – This icing acts as the adhesive and base for fun colors.
• 1 bottle Lemon Yellow Icing Color – Brightens your designs with a cheerful touch!
• 1 bottle Rose Icing Color – Adds a whimsical twist that’s sure to enchant.
• 1 bottle Violet Icing Color – Perfect for spooky designs or a stylish accent!
• 1 bottle Golden Yellow Icing Color – Use for creating lovely buckles or embellishments.
• 1 bottle Orange Icing Color – Great for additional accents or securing the cones to cookies.
Now that your magic ingredients are lined up, you're ready to start creating your Halloween Witch Hat Cookies!
Step‑by‑Step Instructions for Halloween Witch Hat Cookies
Step 1: Preheat and Bake
Preheat your oven to 350°F (175°C). Prepare the cake mix according to the package instructions. Fill each sugar cone with about 2 tablespoons of batter and place them upright on a baking sheet. Bake for 15-18 minutes, or until the cones start to rise and a toothpick inserted comes out clean. Allow them to cool completely on a wire rack.
Step 2: Trim and Color the Cones
Once the cones are cool, carefully trim any excess cake from the tops to create a clean edge. Evenly spray the cones with black color mist food coloring, ensuring full coverage for that spooky witchy look. Allow the coating to dry completely, creating the perfect canvas for your Halloween Witch Hat Cookies.
Step 3: Prepare the Icing
Divide the creamy white decorator icing into separate bowls, reserving some for the base. Color one bowl with lemon yellow, then choose rose or violet for another. Mix thoroughly to achieve vibrant shades. Transfer your colored icing into piping bags, preparing them for the fun and festive decorating that awaits your Halloween Witch Hat Cookies.
Step 4: Assemble the Cookies
Pipe a small dollop of orange icing onto the center of each chocolate cookie to act as adhesive. Carefully position a colored sugar cone on top of each cookie, pressing gently to secure it. Next, pipe additional orange or purple icing around the cone's base to create a charming, whimsical look for your Halloween Witch Hat Cookies.
Step 5: Add the Finishing Touches
Allow the orange icing to set for about five minutes. Once firm, pipe a cheerful yellow buckle around the band of each cone. This finishing touch adds an extra flair to your delightful Halloween Witch Hat Cookies. Let them dry completely for a festive centerpiece that’s sure to impress your friends and family!
Expert Tips for Halloween Witch Hat Cookies
• Cake Mix Choice: Use a flavor your family loves; this can make a noticeable difference in taste and enjoyment!
• Cone Care: Handle the sugar cones gently to avoid breakage; a sturdy base ensures your witch hats stand tall and proud.
• Coloring Technique: When spraying the cones, hold the can about 6-8 inches away for even coverage and a professional look.
• Icing Consistency: If your icing is too runny, it may not hold shapes well; add powdered sugar to thicken if needed for your Halloween Witch Hat Cookies.
• Setting Time: Allow icing to set adequately between steps to avoid smudging; patience here pays off with beautifully finished treats!
Make Ahead Options
These Halloween Witch Hat Cookies are a fantastic choice for busy home cooks looking to save time during the spooky season! You can prepare the sugar cones filled with cake batter up to 24 hours in advance; simply store them in an airtight container at room temperature after they've cooled. The prepared and colored icing can be made up to 3 days in advance and kept refrigerated in sealed piping bags—just remember to bring them back to room temperature before using. When you're ready to assemble, simply pipe orange icing on the chocolate cookies, secure the cones, and add your finishing touches. With these make-ahead tips, your Halloween Witch Hat Cookies will be just as delightful and festive!
Variations & Substitutions for Halloween Witch Hat Cookies
Feel free to sprinkle your own creativity into these cookies, making them uniquely yours while enhancing every delicious bite.
-
Gluten-Free: Use a gluten-free cake mix to ensure everyone can enjoy the festive fun without worry. It’s a small swap that opens the door to more happy faces!
-
Dairy-Free: Swap out the creamy white decorator icing for a dairy-free alternative. This adjustment allows those with dairy sensitivities to indulge in tasty treats!
-
Spicy Kick: Add a pinch of cayenne pepper to your orange icing for a surprising heat that contrasts wonderfully with the sweetness. Just a hint goes a long way to tantalize taste buds!
-
Flavor Infusion: Substitute the cake mix with flavored varieties like lemon or chocolate fudge for a fun twist that adds depth to your witch hats. You’ll be amazed how different mixes can invoke new memories!
-
Nutty Crunch: Add crushed nuts or pretzels as a crunchy topping around the base of each cone to enhance texture and give a bit of extra flavor. The combination is delightfully unexpected and delightful!
-
Candy Accents: Top your icing with festive candy decorations like gummy worms or candy pumpkins for a playful touch that invites a sense of childhood nostalgia while wowing your guests.
-
Chocolate-dipped Cones: For an even sweeter treat, dip the tops of the sugar cones in melted chocolate before decorating. This creates a delicious decadence that heightens the witchy charm!
-
Mini Versions: Create mini witch hat cookies by using smaller sugar cones and cookie bases. They're perfect for little hands and make for an adorable addition to any party platter.
With these customizable ideas, there’s no limit to the creativity and fun you can have while making these Halloween Witch Hat Cookies! To make your treats even more enchanting, consider serving them alongside some festive drinks or other easy Halloween treats for a spooktacular experience.
What to Serve with Halloween Witch Hat Cookies?
As you conjure the magic of Halloween in your kitchen, consider pairing these deliciously spooky cookies with delightful accompaniments that enhance their charm.
-
Spiced Apple Cider: Warm, aromatic cider adds a comforting spice that complements the sweetness of the cookies, perfect for fall gatherings.
-
Chocolate Milkshake: Creamy and rich, this classic dessert drink balances the playful flavors of the cookies, making for a delightful treat option.
-
Pumpkin Spice Cupcakes: Bring in the flavors of the season! These moist cupcakes resonate with the festive vibe of Halloween, creating a beautiful display.
-
Gingerbread Men: Add a whimsical touch to your dessert table; their spicy flavor contrasts nicely with the sweet, colorful witch hat cookies.
-
Candy Corn: Embrace the Halloween spirit with this classic treat, offering a fun and crunchy texture that kids adore.
-
Caramel Dipping Sauce: A luscious addition! Drizzling caramel adds indulgence and complements the chocolate cookies’ texture beautifully.
-
Vanilla Ice Cream: Serve alongside the cookies for a fun combination; the creamy coldness perfectly balances their delightful sweetness.
-
Pecan Pie Squares: Their rich filling and flaky crust will send taste buds twirling, adding a delightful variety to your Halloween spread.
-
Sparkling Water with Citrus: Refreshing and bubbly, this vibrant drink cleanses the palate between servings and keeps the festive mood alive.
Each pairing is a treat in its own right, creating an inviting holiday experience that will leave your friends and family enchanted this Halloween!
How to Store and Freeze Halloween Witch Hat Cookies
Room Temperature: Store any leftover Halloween Witch Hat Cookies in an airtight container at room temperature for up to 3 days to maintain freshness.
Fridge: If you prefer a longer shelf life, keep the cookies in the fridge for up to a week. Just make sure they’re well wrapped to avoid drying out.
Freezer: Freeze unassembled cookies (cookies and cones separately) in airtight containers for up to 3 months. Thaw at room temperature before decorating.
Reheating: To enjoy warm cookies, briefly microwave them for 10-15 seconds. Avoid reheating decorated cookies to maintain their visual appeal!

Halloween Witch Hat Cookies Recipe FAQs
What kind of cake mix should I use?
Absolutely! You can use any flavor of cake mix that your family loves, like chocolate, vanilla, or even funfetti for a festive touch! The flavor of the cake will influence the overall taste of the Halloween Witch Hat Cookies, so choose one that brings a smile to your face.
How should I store leftover Halloween Witch Hat Cookies?
To keep your cookies fresh, store any leftovers in an airtight container at room temperature for up to 3 days. If you want to extend their shelf life, you can refrigerate them for up to a week. Just make sure they are well wrapped to prevent them from drying out!
Can I freeze Halloween Witch Hat Cookies?
Yes, you can! For the best results, freeze the cookies unassembled—keep the chocolate cookies and sugar cones stored separately in airtight containers. They will stay fresh for up to 3 months. When you’re ready to decorate, simply thaw them at room temperature for a couple of hours.
What’s the best way to prevent the icing from running?
Great question! If your icing is runny, it might not hold its shape as well. To fix this, you can add powdered sugar a little at a time until you reach your desired consistency. Make sure to allow each layer of icing to set for about 5 minutes before adding another to maintain those beautiful finishes on your Halloween Witch Hat Cookies.
Is there a way to make these cookies pet-friendly?
I highly recommend keeping these treats strictly for humans! The sugar and decorative elements, particularly food coloring and certain icings, can be harmful to pets. If you’d like to involve your furry friends, consider making a separate batch of pet-friendly cookies using ingredients safe for them, like oat flour and peanut butter!
Make Spooky Fun: Delicious Halloween Witch Hat Cookies
Equipment
- Oven
- Baking sheet
- Piping bags
- wire rack
- Bowls
Ingredients
For the Cookies
- 1 box Favorite Cake Mix Choose a flavor that your family loves.
- 24 pieces Store Bought Chocolate Cookies These serve as the base for your witch hats.
For the Hats
- 12 pieces Sugar Cones These will create the iconic witch hat shape.
For the Decorations
- 1 can Black Color Mist Food Coloring Spray For a spooky look on the cones.
- 1 cup Creamy White Decorator Icing Acts as the adhesive and base for colors.
- 1 bottle Lemon Yellow Icing Color Brightens your designs.
- 1 bottle Rose Icing Color Adds a whimsical twist.
- 1 bottle Violet Icing Color Perfect for spooky designs.
- 1 bottle Golden Yellow Icing Color For creating lovely buckles.
- 1 bottle Orange Icing Color For securing the cones to cookies.
Instructions
Step-by-Step Instructions
- Preheat your oven to 350°F (175°C). Prepare the cake mix according to the package instructions. Fill each sugar cone with about 2 tablespoons of batter and place them upright on a baking sheet. Bake for 15-18 minutes, or until the cones start to rise and a toothpick inserted comes out clean. Allow them to cool completely on a wire rack.
- Once the cones are cool, carefully trim any excess cake from the tops to create a clean edge. Evenly spray the cones with black color mist food coloring, ensuring full coverage. Allow the coating to dry completely.
- Divide the creamy white decorator icing into separate bowls, reserving some for the base. Color one bowl with lemon yellow, then choose rose or violet for another. Transfer your colored icing into piping bags.
- Pipe a small dollop of orange icing onto the center of each chocolate cookie. Carefully position a colored sugar cone on top of each cookie, pressing gently. Pipe additional orange or purple icing around the cone's base.
- Allow the orange icing to set for about five minutes. Once firm, pipe a cheerful yellow buckle around the band of each cone. Allow to dry completely.


Leave a Reply