
While sipping on a cup of warm cider, the delightful scent of baking cookies filled the air, bringing forth memories of playful Halloween parties and laughter. My latest culinary adventure led me to create Creepy Witch Finger Cookies, a fabulously spooky treat that not only stirs the imagination but is also incredibly fun to make! These cookies are the perfect combination of a creative outlet and a crowd-pleaser, easily winning over both kids and adults alike. Plus, with just a few unusual ingredients like matcha for a pop of color and almond "nails," you’ll elevate your baking game while ensuring your spooky season celebrations are memorable. Ready to impress your friends and family with a dish that’s a little bit creepy and a whole lot comforting? Let's dive into creating these enchanting treats!

Why Are Creepy Witch Finger Cookies Amazing?
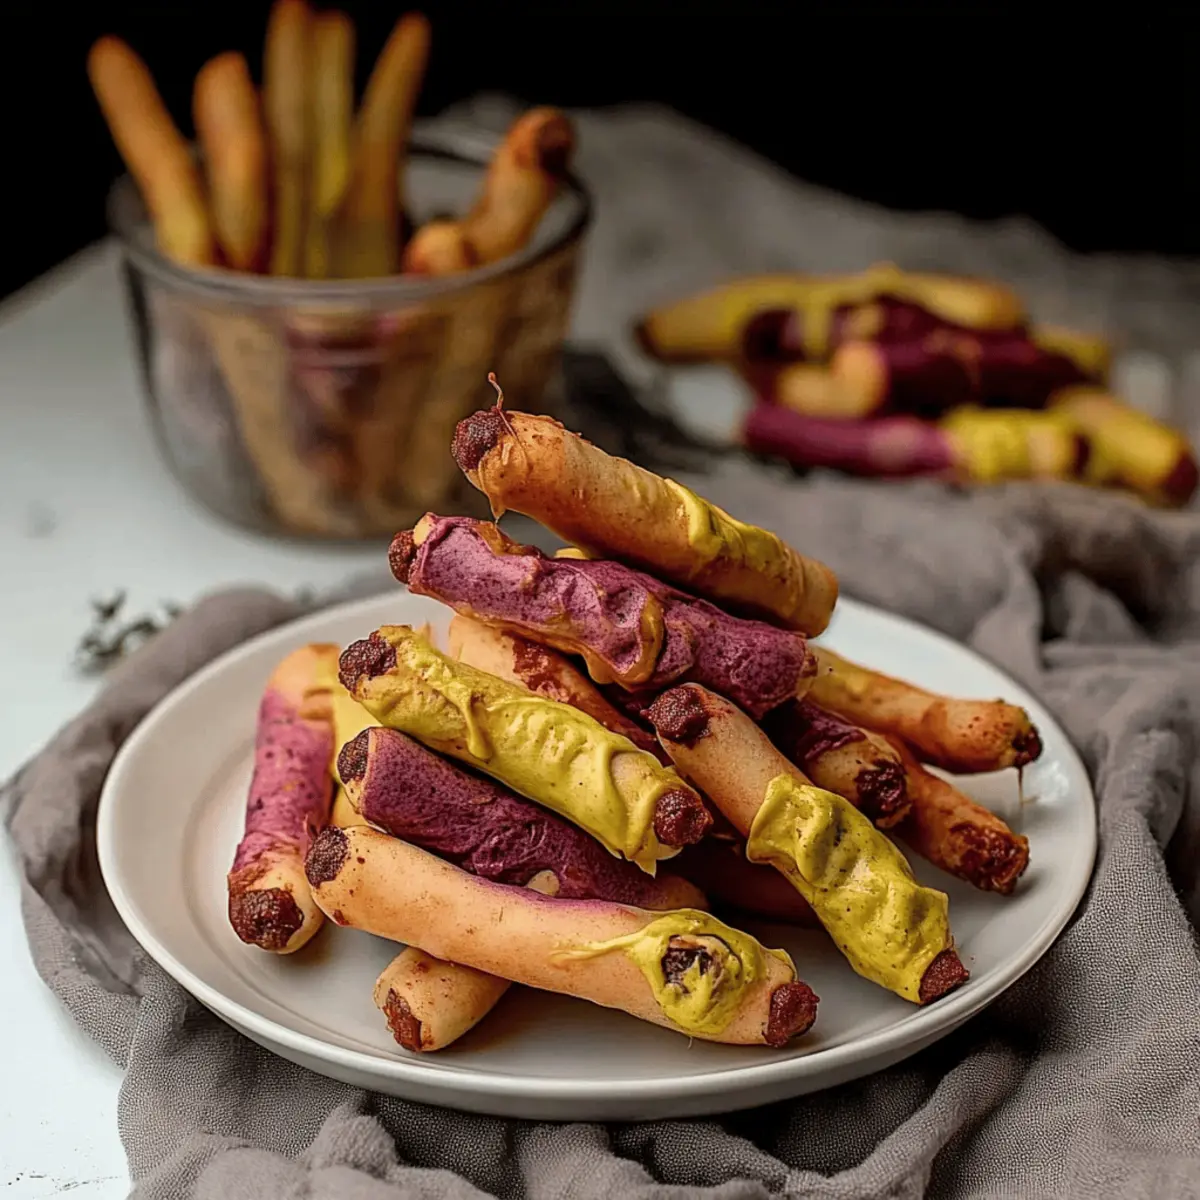
Uniqueness: These cookies aren’t just treats; they’re edible art! Colorful with matcha and sweet potato powder, they create a visual feast. Interactive baking makes these perfect for family fun and gatherings. Crowd-Pleaser: Kids and adults will be amazed at these spooky delights. Versatile: You can switch up colors and decorations—try using different jams or edible glitter for extra flair! Whether for Halloween or just a whimsical treat, these cookies will leave everyone wanting more!
Creepy Witch Finger Cookies Ingredients
Get ready to conjure up some spooky delights with these fun ingredients!
For the Cookie Dough
- 226 g unsalted butter – soften it to create a creamy texture that holds the cookies together.
- 140 g confectioner’s sugar – gives the cookies a sweet flavor and a delicate crumb.
- 1 teaspoon sea salt – enhances the flavors and balances the sweetness.
- 4 egg yolks – at room temperature, these add richness and help bind the ingredients.
- 5 mL vanilla extract – a splash for warmth and comforting aroma.
- 454 g all-purpose flour – forms the base of the dough and provides structure.
- ¼ teaspoon baking powder – helps the cookies rise slightly and maintain a soft texture.
For the Color
- 4 - 6 g matcha powder – adds a vibrant green hue for a creepy effect.
- 20 - 30 g purple sweet potato powder – perfect for a spooky twist of color!
- 5 - 15 g cocoa powder – gives a deep, earthy color to mimic gnarled fingers.
For the Decoration
- 50 whole blanched almonds – these are the perfect “nails” for your witch fingers!
- Cocoa powder – for dusting, making your cookies appear like they’ve just crawled out of the earth.
- Strawberry jam or raspberry jam – use this to attach the almonds for a gory touch!
- Red cake writing gel or red food color with corn syrup – for that final splash of spooky detail.
- Melted white chocolate or candy wafers – drizzle over for a tempting icing finish!
Let the baking begin and create some unforgettable Creepy Witch Finger Cookies that are sure to wow your friends and family!
Step‑by‑Step Instructions for Creepy Witch Finger Cookies
Step 1: Cream the Butter and Sugar
In a mixing bowl, use an electric mixer to cream 226 g of softened unsalted butter, 140 g of confectioner’s sugar, and 1 teaspoon of sea salt together until the mixture is light and fluffy, about 2-3 minutes. This will ensure a tender texture for your Creepy Witch Finger Cookies, so take your time with this step to achieve the perfect creaminess.
Step 2: Mix in the Egg Yolks and Vanilla
Add 4 room temperature egg yolks and 5 mL of vanilla extract to the bowl, mixing until everything is well combined and smooth. This rich combination enhances the flavor of the cookie dough. Make sure no lumps remain for even baking, which is essential for delicate Creepy Witch Finger Cookies.
Step 3: Incorporate Colorful Ingredients
To elevate the look of your cookies, you can divide the butter mixture into portions. Stir in matcha for green, purple sweet potato powder for a spooky shade, or cocoa powder for a more sinister hue, each in increments of 4-6 g, 20-30 g, or 5-15 g respectively. Aim for your desired colors, ensuring everything is blended beautifully.
Step 4: Prepare the Dry Ingredients
In a separate bowl, whisk together 454 g of all-purpose flour and ¼ teaspoon of baking powder. This will create a light structure for your Creepy Witch Finger Cookies, so mix well until fully combined. Once ready, it’s crucial to gradually incorporate this dry mixture into the butter mixture in the next step.
Step 5: Form the Cookie Dough
Gradually fold the flour mixture into the creamed butter mixture, stirring gently until a soft dough forms. Avoid overworking the dough to keep your cookies tender. Once combined, the dough should be moist but not sticky, making it easier to shape into the witch fingers for your spooky treats.
Step 6: Chill the Dough
Shape the finished dough into discs, then wrap each disc in plastic wrap and refrigerate for 20-30 minutes. This chilling step is vital for firming up the dough, making it easier to shape into fingers. As you wait, you can prepare your baking trays and almond "nails" for the next steps.
Step 7: Shape the Witch Fingers
After chilling, remove the dough and use a cookie scoop to take out portions of about 16-20 g each. Roll these into finger shapes, aiming for eerie, elongated forms. This is where your creativity shines—use your hands to create realistic knuckle shapes for your Creepy Witch Finger Cookies.
Step 8: Add Knuckle Details
Using a butter knife, gently score lines on each finger to create a knuckle effect. This will add a level of creepy detail that makes your cookies visually striking. Take this opportunity to personalize each “finger,” ensuring your Creepy Witch Finger Cookies have their own unique character.
Step 9: Attach Almond Fingernails
Press an almond into the tip of each finger to serve as the fingernail, gently pushing down so that it sticks well. This step is crucial, as it brings your spooky cookies to life and adds texture. You’ll start to see your Creepy Witch Finger Cookies transform into ghoulish treats ready for baking!
Step 10: Freeze the Shaped Cookies
Place your cookies on a parchment-lined tray and transfer them to the freezer, allowing them to freeze for 40-60 minutes. This helps the cookies maintain their shape while baking, ensuring your Creepy Witch Finger Cookies come out looking just as you shaped them.
Step 11: Preheat the Oven
While the cookies freeze, preheat your oven to 325°F (163°C). A properly heated oven is key to achieving that perfect bake, allowing the bottoms to brown while keeping the tops soft. This temperature will help your Creepy Witch Finger Cookies come out beautifully without overbaking.
Step 12: Bake the Cookies
Once the oven is ready, bake the frozen cookies for 20-25 minutes, or until the bottoms are lightly browned while the tops remain pale. Keep a close eye—this is essential for achieving the ideal texture and color for your Creepy Witch Finger Cookies, ensuring they remain spooky yet delightful.
Step 13: Cool and Decorate
After baking, let the cookies cool completely. Once cooled, attach the almonds using strawberry or raspberry jam for a gory effect. For added flair, you might brush cocoa powder on for a dirt effect and drip melted white chocolate or candy wafers over the top, bringing your Creepy Witch Finger Cookies to a deliciously eerie finish!
Expert Tips for Creepy Witch Finger Cookies
- Butter Softness Matters: Make sure your butter is properly softened, not melted, for the best texture. Cold butter won’t cream well, which can lead to dense cookies.
- Avoid Overmixing: When combining the flour and butter mixtures, mix just until incorporated. Overworking the dough can toughen your Creepy Witch Finger Cookies, yielding less tender results.
- Freezing is Key: Don’t skip the freezing step! It helps maintain the fingers' shape while baking, preventing them from spreading too much.
- Creativity with Colors: Feel free to experiment with different colored powders. You can also add flavorings that match the colors, such as almond extract for green!
- Perfect Almond Placement: Press the almonds firmly into the dough to ensure they stay put during baking. If they pop off, attach them with more jam after baking.
How to Store and Freeze Creepy Witch Finger Cookies
Room Temperature: Keep your finished Creepy Witch Finger Cookies in an airtight container at room temperature for up to 3 days to preserve their freshness.
Fridge: Store cookies in the fridge for up to a week. Make sure they are in an airtight container to prevent them from absorbing any odors.
Freezer: For longer storage, place them in a freezer-safe container or bag, separating layers with parchment paper. They can be frozen for up to 3 months.
Reheating: To enjoy them warm, reheat straight from the fridge or freezer in a preheated oven at 300°F (150°C) for 5-10 minutes, until they're warmed through.
Make Ahead Options
These Creepy Witch Finger Cookies are a fantastic choice for meal prep, allowing you to bring spooky flair with minimal last-minute effort! You can prepare the cookie dough and shape it into fingers up to 24 hours in advance; simply wrap the formed cookies in plastic wrap and refrigerate them. Alternatively, shaped cookies can be frozen for up to 3 days before baking. Just remember to freeze them on a parchment-lined tray first and then transfer to a sealed container to maintain their quality. When you’re ready to bake, pop them straight from the freezer into a preheated oven for 20-25 minutes, ensuring you'll have fresh, frightfully delicious treats without the stress!
What to Serve with Creepy Witch Finger Cookies
Experience a delightful Halloween gathering, where the eerie aesthetic meets irresistible sweetness and laughter fills the air.
-
Spooky Hot Chocolate: This rich, creamy drink is the perfect cozy companion, with a sprinkle of marshmallows to add some fun!
-
Pumpkin Spice Muffins: These muffins feature warm spices and a moist texture, making them a perfectly seasonal pairing that resonates with the flavors of fall.
-
Ghostly Cheese Platter: A selection of spooky-themed cheeses and crackers will add a savory touch, balancing the sweetness of your cookies with delicious flavors.
-
Fruit Skeletons: Arrange fresh fruits like grapes and melons in the shape of skeletons for a fun, fresh addition that offers hydration and a burst of color.
-
Candy Corn Milkshakes: Deliciously sweet and visually tempting, these will enchant your guests while tying in the beloved Halloween theme.
-
Witches' Brew Punch: A fizzy, colorful punch with floating “eyeballs” (lychee fruit with blueberries) is an interactive beverage that adds excitement to the party atmosphere.
-
Caramel Apple Slices: These sweet and crunchy treats offer a delightful crunch and can be decorated to further enchant your guests, aligning perfectly with the fall season.
Embrace the spirit of Halloween and create a mini buffet of treats that will keep your friends and family coming back for more!
Creepy Witch Finger Cookies Variations
Feel free to get creative and make these cookies your own with delightful twists!
- Gluten-Free: Substitute all-purpose flour with a gluten-free flour blend to accommodate dietary needs. The texture might differ slightly, but they’ll still be delicious!
- Sugar-Free: Use a sugar substitute like erythritol for a lower-calorie option without sacrificing sweetness. These treats can be enjoyed by those watching their sugar intake.
- Nut-Free: Replace almonds with sunflower seeds for a friendly alternative for those with nut allergies. Not only are they safe, but they also add a nice crunch!
- Chocolate Lovers: Incorporate chocolate chips into the dough for an added burst of flavor. Chocolate and matcha create a delightful contrast sure to please chocolate enthusiasts!
- Spicy Kick: For a surprising flavor twist, mix in a pinch of cayenne or chili powder into the dough. The subtle heat will enhance the overall flavor profile!
- Vegan Option: Substitute butter with vegan margarine and replace egg yolks with flaxseed meal mixed with water. They’ll still turn out delightfully spooky!
- Decorative Swaps: Instead of jam, try using edible glitter or colored icing for a fun, creative twist during decorating. This can turn your cookies into festive, eye-catching treats!
- Seasonal Flavors: Mix in 1 teaspoon of pumpkin spice for warm autumn flavors, making these cookies perfect for Halloween celebrations. It adds warmth and comfort to each bite!
These variations can elevate your Creepy Witch Finger Cookies, ensuring they suit any gathering or preference. For more playful baking ideas, check out my recipe for Ghostly Meringue Cookies or add a spooky twist to your decor with my guide on Halloween-Themed Treats. Happy baking!

Creepy Witch Finger Cookies Recipe FAQs
How do I select the best ingredients for my Creepy Witch Finger Cookies?
Absolutely! For butter, aim for a high-quality unsalted variety to ensure the best flavor. When choosing eggs, look for large eggs that are at room temperature for optimal mixing. For the flour, all-purpose works great, but ensure it's fresh for the best results. If you're using powders like matcha or sweet potato, check that they are vibrant and not past their expiration date. This will elevate the taste and appearance of your cookies!
How should I store Creepy Witch Finger Cookies?
Very! To keep your cookies fresh, store them in an airtight container at room temperature for up to 3 days. If you’d like them to last longer, they're perfectly fine in the fridge for up to a week. Just remember to keep them sealed tight. This will prevent them from drying out or soaking up any odors from the fridge!
Can Creepy Witch Finger Cookies be frozen?
Definitely! To freeze your cookies, allow them to cool completely, then layer them in a freezer-safe container, separating each layer with parchment paper. They can remain in the freezer for up to 3 months. When you’re ready to enjoy them, reheat from the freezer in a preheated oven at 300°F (150°C) for about 5-10 minutes until warmed through. It’s like magic!
What if my cookie dough is too sticky?
No worries! If you find your dough is sticking too much while shaping, it’s likely due to either too much moisture or not enough flour. You can sprinkle a little more all-purpose flour to help with this. Just be careful not to add too much, as that can make your cookies tough. If the dough feels too soft, chilling it longer can also help firm it up before shaping.
Are Creepy Witch Finger Cookies safe for pets or allergies?
It’s important to note that these cookies contain ingredients like butter, sugar, and almonds, which may not be suitable for pets, especially dogs. If there are allergies within your family—specifically to nuts or gluten—consider substituting almond toppings with seeds or using gluten-free flour that’s designed for baking. Always ensure that the adapted ingredients align with dietary needs for everyone involved!

Creepy Witch Finger Cookies That Wow at Halloween Parties
Equipment
- Mixing bowl
- Electric mixer
- Cookie scoop
- Butter Knife
- parchment paper
- freezer-safe container
- Oven
Ingredients
For the Cookie Dough
- 226 g unsalted butter softened
- 140 g confectioner’s sugar
- 1 teaspoon sea salt
- 4 large egg yolks room temperature
- 5 mL vanilla extract
- 454 g all-purpose flour
- 0.25 teaspoon baking powder
For the Color
- 4-6 g matcha powder
- 20-30 g purple sweet potato powder
- 5-15 g cocoa powder
For the Decoration
- 50 whole blanched almonds
- cocoa powder for dusting
- strawberry jam or raspberry jam for attaching almonds
- red cake writing gel or red food color with corn syrup for decoration
- melted white chocolate or candy wafers for icing
Instructions
Step-by-Step Instructions
- In a mixing bowl, cream the butter, confectioner’s sugar, and sea salt until light and fluffy, about 2-3 minutes.
- Mix in the egg yolks and vanilla extract until well combined and smooth.
- Divide the butter mixture and stir in matcha, sweet potato powder, or cocoa powder to achieve desired colors.
- In a separate bowl, whisk together the flour and baking powder, then gradually incorporate into the butter mixture.
- Fold the flour mixture into the creamed butter mixture gently until a soft dough forms.
- Shape the dough into discs, wrap in plastic, and refrigerate for 20-30 minutes.
- After chilling, roll portions of the dough into finger shapes.
- Score lines on each finger with a butter knife to create knuckle details.
- Press an almond into the tip of each finger for a fingernail.
- Freeze cookies on a parchment-lined tray for 40-60 minutes.
- Preheat the oven to 325°F (163°C) while cookies freeze.
- Bake the cookies for 20-25 minutes until the bottoms are lightly browned.
- Let cookies cool completely, then attach almonds with jam and dust with cocoa powder.
- Drizzle with melted chocolate or wafers for decoration.


Leave a Reply