
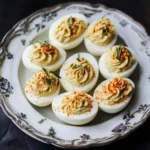
You know that moment when you spot deviled eggs at a party and your heart does a little happy dance? That vibrant yellow filling nestled in a smooth white base, and that first perfectly seasoned bite that takes you right back to your grandmother's kitchen. There's something magical about these two-bite wonders that have graced our holiday tables and get-togethers for generations.
I've honestly been tweaking my deviled egg recipe for years (much to the delight of my very patient family). After countless batches and tiny adjustments, I've finally landed on this version that consistently has friends cornering me in the kitchen asking, "So… are you going to share this recipe or what?" With just six ingredients you probably already have at home, these deviled eggs hit that perfect sweet spot of creamy, tangy goodness that makes them vanish within minutes at any gathering.
Why You'll Love This Recipe
- That texture though: Silky smooth filling paired with tender egg whites that actually makes you close your eyes when you take a bite
- Make 'em ahead: Prep everything up to 3 days before your gathering (hello, stress-free hosting!)
- Nothing fancy needed: Just everyday ingredients from your fridge and pantry
- Play with flavors: Once you master this classic version, the variations are endless
Recipe Essentials
🕒 Total Time: Prep: 15 mins · Cook: 10 mins · Total: 25 mins
🍽️ Servings: 24 deviled egg halves (12 servings)
👨🍳 Skill Level: Beginner
🥚 Calories: 89 per serving (2 halves)
🧰 Essential Tools: Pot for boiling, mixing bowl, pastry bag or spoon
Ingredients for Deviled Eggs
For the Eggs:
- 12 large eggs: Funny enough, those super-fresh eggs from the farmers market aren't your best bet here - eggs that are about a week old peel much easier
- ⅓ cup mayonnaise: Go for real mayo here - not the time for light versions (trust me on this one)
- 2 tablespoons pickle relish: Adds that tangy zip and tiny bits of texture that break up the creaminess
- 1 ½ teaspoons Dijon mustard: Brings that sharp little kick that makes you go back for seconds
- Salt and freshly ground black pepper: The unsung heroes that make all the other flavors pop
- Paprika: That classic reddish sprinkle that makes everyone say, "Now those are deviled eggs!"
Full measurements can be found in the recipe card below
How to Make Deviled Eggs
Step 1: Hard Boil the Eggs Place your eggs in a single layer in a saucepan and cover them with cold water by 1 inch. Bring to a rolling boil over medium-high heat. Once the water's bubbling away, add 1 teaspoon baking soda (my grandmother's trick for easier peeling), then remove from heat, cover, and let them hang out for exactly 12 minutes.
Step 2: Cool and Peel Transfer your eggs straight to an ice bath and let them chill for 15 minutes. This temperature shock helps separate the shell from the egg and stops that grayish ring from forming around the yolk. Tap each egg gently on your counter and roll it to create cracks all over, then peel under cool running water, starting from the wider end where there's a little air pocket.
Step 3: Prepare Egg Halves Slice each peeled egg lengthwise with a sharp knife. Pop out the yolks by gently pressing on the back of each white half, collecting all those golden centers in a medium bowl. Arrange the whites on your serving platter or that special deviled egg tray your mom handed down to you.
Step 4: Make the Filling Add your mayo, pickle relish, and Dijon to the yolks. Grab a fork and mash everything together until it's smooth and creamy. I sometimes press the mixture through a fine-mesh sieve when I'm feeling fancy and want that ultra-silky texture. Give it a taste and add salt and pepper until it makes you say "mmm" out loud. Add an extra dollop of mayo or touch of mustard if needed - your kitchen, your rules.
Step 5: Fill the Egg Whites You can pipe the filling using a star tip if you're showing off for company, or just use two small spoons to fill each egg white if you're keeping it casual. Fill each half with a generous mound that rises slightly above the surface of the white.
Step 6: Garnish and Serve Just before bringing them to the table, dust the tops with paprika. My mom always used a small sieve to get that perfect light dusting. Pop them in the fridge until you're ready to serve, ideally within a couple hours for the best taste and texture.
Texture and Final Result
When you bite into one of these eggs, you'll get that perfect contrast - the tender egg white gives way to the velvety, whipped yolk filling that practically melts on your tongue. Each bite offers that comforting richness from the mayo, a bright tang from the mustard and relish, and a satisfying creaminess that somehow feels both fancy and like home cooking at the same time.
It's like comfort food dressed up for a party - familiar enough to make you smile but special enough for any gathering.
Expert Tips for Success
- Grab the older eggs from the back of your fridge - they'll actually peel easier than the fresh ones
- That ice bath isn't optional - it's the secret to prevent the ugly green ring and makes peeling so much easier
- Always taste your filling before assembling - your preference for tanginess and salt might be different from mine
- Heading to a potluck? Keep the filling in a ziplock bag and cut the corner to pipe at your destination
- For eggs that sit perfectly on the platter, slice a tiny bit off the rounded bottom to create a flat base
Storage & Make-Ahead
You can store your assembled deviled eggs in an airtight container in the fridge for up to 2 days. If you're planning ahead, keep the filling and egg whites separate for up to 3 days, then put them together shortly before your guests arrive.
Taking them to a friend's place? Those egg carriers with the little depressions work great, but I've also lined a container with parchment paper and secured the eggs with toothpicks in a pinch.
Here's a little kitchen hack: If you have leftover deviled eggs that are looking a bit tired the next day, chop them up and mix with a bit more mayo and mustard. Boom - instant egg salad sandwiches for lunch!
Variations & Customizations
For the health-conscious: Swap half or all of the mayo with Greek yogurt. You'll get a tangier, protein-rich version with fewer calories.
For the bacon lovers: Mix in 3 tablespoons of crumbled crispy bacon and top each egg with an extra bacon bit. My brother-in-law won't eat them any other way now.
California-style: Replace half the mayo with ripe mashed avocado and add a squeeze of lime juice. It's creamy with a fresh twist that always gets compliments.
For those who like it hot: Add 1-2 teaspoons of hot sauce or a sprinkle of cayenne to the filling, then garnish with smoked paprika. My neighbor Dave asks for these specifically at every backyard BBQ.
Serving Suggestions
Deviled eggs really shine as part of a bigger spread:
- Alongside your Easter ham and spring veggies (they're always the first to disappear from my holiday table)
- At summer cookouts next to fried chicken and potato salad
- During cocktail hour with your cheese board and veggies with dip
- As a light starter before a big holiday meal when everyone's milling around the kitchen
For a pretty presentation that'll get some "oohs" and "aahs," try arranging them on a bed of fresh microgreens or sprinkle with snipped chives or dill. And a little tip: serve them cool but not straight-from-the-fridge cold - the flavors really open up when they're not ice cold.
FAQs about Deviled Eggs
What are all the ingredients for classic deviled eggs?
The must-haves for classic deviled eggs are hard-boiled eggs, mayonnaise, mustard (usually Dijon or yellow), salt, pepper, and paprika for that signature topping. Many family recipes (including mine) also add pickle relish or a splash of vinegar for extra tang. You can jazz them up with herbs, bacon, or hot sauce, but those six basic ingredients are the backbone of what makes deviled eggs, well, deviled eggs.
What are the five golden rules of deviled eggs?
- Watch that cooking time like a hawk – nobody wants rubbery whites and chalky, gray-ringed yolks
- Plunge them in ice water right away – this stops the cooking and makes those shells practically slide off
- Mash those yolks until they're silky smooth – lumpy filling is just sad and ruins the experience
- Get the flavor balance just right – you want that perfect harmony between creamy, tangy, and savory
- Keep them properly chilled – both for safety and because warm deviled eggs are just wrong
Why do people put vinegar in deviled eggs?
Vinegar does two important things in deviled eggs. First, it adds that bright, tangy kick that cuts through all the richness of the yolks and mayo – kind of like how a squeeze of lemon brings seafood to life. Second, it actually helps preserve the eggs a bit longer, which is handy when you're prepping ahead. In my recipe, the pickle relish already brings that tangy element since the brine contains vinegar. If you're not a pickle fan, you can just add 1-2 teaspoons of white or apple cider vinegar instead.
How long should you boil your eggs for deviled eggs?
Here's the thing – you don't actually want to boil them the whole time. The method that's never failed me is to bring them to a boil, then remove from heat and let them sit, covered, in the hot water for exactly 12 minutes (for large eggs). This gentle method keeps you from overcooking and getting that unappetizing green-gray ring. Using extra-large eggs? Add a minute. Medium eggs? Subtract a minute. If you have an Instant Pot, 5 minutes at high pressure with a 5-minute natural release also works beautifully, and those eggs practically peel themselves.
Classic deviled eggs are one of those rare recipes that have stood the test of time for good reason. They're budget-friendly, incredibly versatile, and somehow make everyone feel nostalgic even if they grew up eating a totally different version. Whether you're making them for a big family gathering or just because it's Tuesday and you deserve something special, this recipe delivers that perfect comforting flavor that never goes out of style.
Have you tried making these deviled eggs? What's your favorite tweak to the classic recipe? Drop me a comment below – I'm always looking for new ideas!
Craving more crowd-pleasers? Check out Ultimate Party Appetizers Collection for more recipes that'll make you the hero of any gathering.
PrintThe Perfect Classic Deviled Eggs: Creamy, Tangy & Impossibly Addictive
This easy Coconut Ice Slice recipe offers a nostalgic, no-bake treat featuring two-tone layers. Combining condensed milk and desiccated coconut, it's a foolproof confectionery perfect for celebrations.
- Prep Time: 10 minutes
- Cook Time: 0 minutes
- Total Time: 10 minutes plus chilling
- Yield: Varies depending on cut size
- Category: Dessert
- Method: No-Bake
- Cuisine: British, Australian
- Diet: Gluten Free
Ingredients
- Icing Sugar (200g / 7oz / 2 cups)
- Desiccated Coconut (300g / 10.5oz / 3.5 cups)
- Condensed Milk (400ml / 14.1oz / one tin)
- Red Food Coloring (3 drops)
Instructions
- In a big mixing bowl, stir together the icing sugar and coconut until well combined. Pour in your condensed milk and mix until too thick to stir, then knead to a sticky dough.
- Line a 24cm/9×9 inch square tin with baking paper. Press half of the coconut mixture firmly into the bottom for the white layer.
- Add 3 drops of red food coloring to remaining mixture and knead to achieve an even pink color.
- Spoon dollops of pink mixture over the white layer, spread using a fork, and press gently to create an even surface.
- Cover with plastic wrap and chill in the fridge for 1-2 hours until set.
- Use the overhanging paper to lift out in one piece. Cut into small squares using a sharp knife, wiping between slices.
Notes
- Don't rush the chilling time; it's essential for setting and clean cuts.
- This treat is quite sweet, so cut into small 1-inch squares.
- Sprinkle the pink layer across rather than placing it in one spot to keep layers distinct.
- If the mixture is sticky, dust hands with icing sugar.
- For clean edges, use a large sharp knife, wipe between cuts, and dip in hot water, drying before each slice.
- Measure ingredients by weight for best results.
Nutrition
- Serving Size: 1 square (approx 1/81 of batch)
- Calories: 45 kcal
- Sugar: 5.4 g
- Sodium: 2 mg
- Fat: 2.9 g
- Saturated Fat: 2.4 g
- Unsaturated Fat: 0.5 g
- Trans Fat: 0 g
- Carbohydrates: 6.2 g
- Fiber: 0.4 g
- Protein: 0.7 g
- Cholesterol: 2 mg
Keywords: Coconut Ice Slice, No-Bake, Coconut Treat, Gluten-Free, Easy Dessert


Leave a Reply