
As I stood in my kitchen, the air filled with the sweet aroma of melting chocolate, I couldn't help but feel a spark of excitement for this delightful, spooky treat: Bat Oreo Cookie Balls! Let me tell you, these adorable little confections not only make for a fun family project but also serve as a perfect crowd-pleaser for your autumn gatherings. The best part? They come together quickly and are incredibly easy to customize, making them a fantastic choice for both novice and experienced home chefs alike. Whether you’re celebrating Halloween or just looking for a unique dessert, these playful cookie balls are sure to elicit smiles and compliments. Ready to find out how to create these whimsical treats that taste just as delicious as they look?
Why Are Oreo Cookie Balls So Irresistible?
Deliciously Unique: These Bat Oreo Cookie Balls combine the beloved flavors of chocolate and cream cheese for a rich taste that's simply unforgettable.
Fun for Everyone: Get the family involved in shaping the cookie balls and decorating them; it’s a memorable way to bond!
Quick to Make: With just 30 minutes of prep and a chill time, you can whip up these treats in no time.
Customizable Delight: Feel free to switch up the toppings or decorations to match any occasion; creativity is your only limit!
Perfect for Parties: Whether it’s Halloween or a cozy gathering, these spooky treats are bound to impress and delight all your guests!
Oreo Cookie Balls Ingredients
For the Cookie Mixture
- Chocolate sandwich cookies – 14 oz (approximately 36 cookies); these are the star of your Oreo Cookie Balls!
- Cream cheese – 8 oz (softened); adds the perfect creaminess and helps bind the cookies together.
For the Coating
- Chocolate candy coating – 10 oz (e.g., Ghirardelli melting wafers, Wilton Candy Melts, or Almond Bark); choose your favorite for a smooth, delicious finish.
With these simple ingredients, you’re just a few steps away from creating these irresistibly fun Bat Oreo Cookie Balls!
Step‑by‑Step Instructions for Oreo Cookie Balls
Step 1: Crush the Cookies
Start by adding the 14 oz of chocolate sandwich cookies into a food processor or blender. Pulse the cookies until they crumble into fine crumbs, resembling graham cracker crumbs, which should only take a few moments. Avoid over-processing; you want a manageable texture for your Oreo Cookie Balls.
Step 2: Combine Ingredients
In a large mixing bowl, combine the crushed cookie crumbs with 8 oz of softened cream cheese. Using a spatula or your hands, mix the two together until well incorporated and form a thick and consistent dough. This step usually takes around 3-5 minutes, and it’s key for giving your Oreo Cookie Balls a delightful creaminess.
Step 3: Form the Cookie Balls
With your hands, grab about 1 tablespoon of the mixture and roll it into a ball, roughly 1 inch in size. Repeat this process until the entire mixture is shaped into individual balls, which should yield about 28-30 cookie balls. Lay them out on a parchment-lined tray, ensuring they don’t touch each other, for easier handling later.
Step 4: Chill for Firmness
Place the tray of shaped cookie balls in the refrigerator and allow them to chill for about 1 hour. This step firms up the texture, making it easier to dip them into the melted chocolate coating later. You’ll know they’re ready when they feel firm to the touch and hold their shape well.
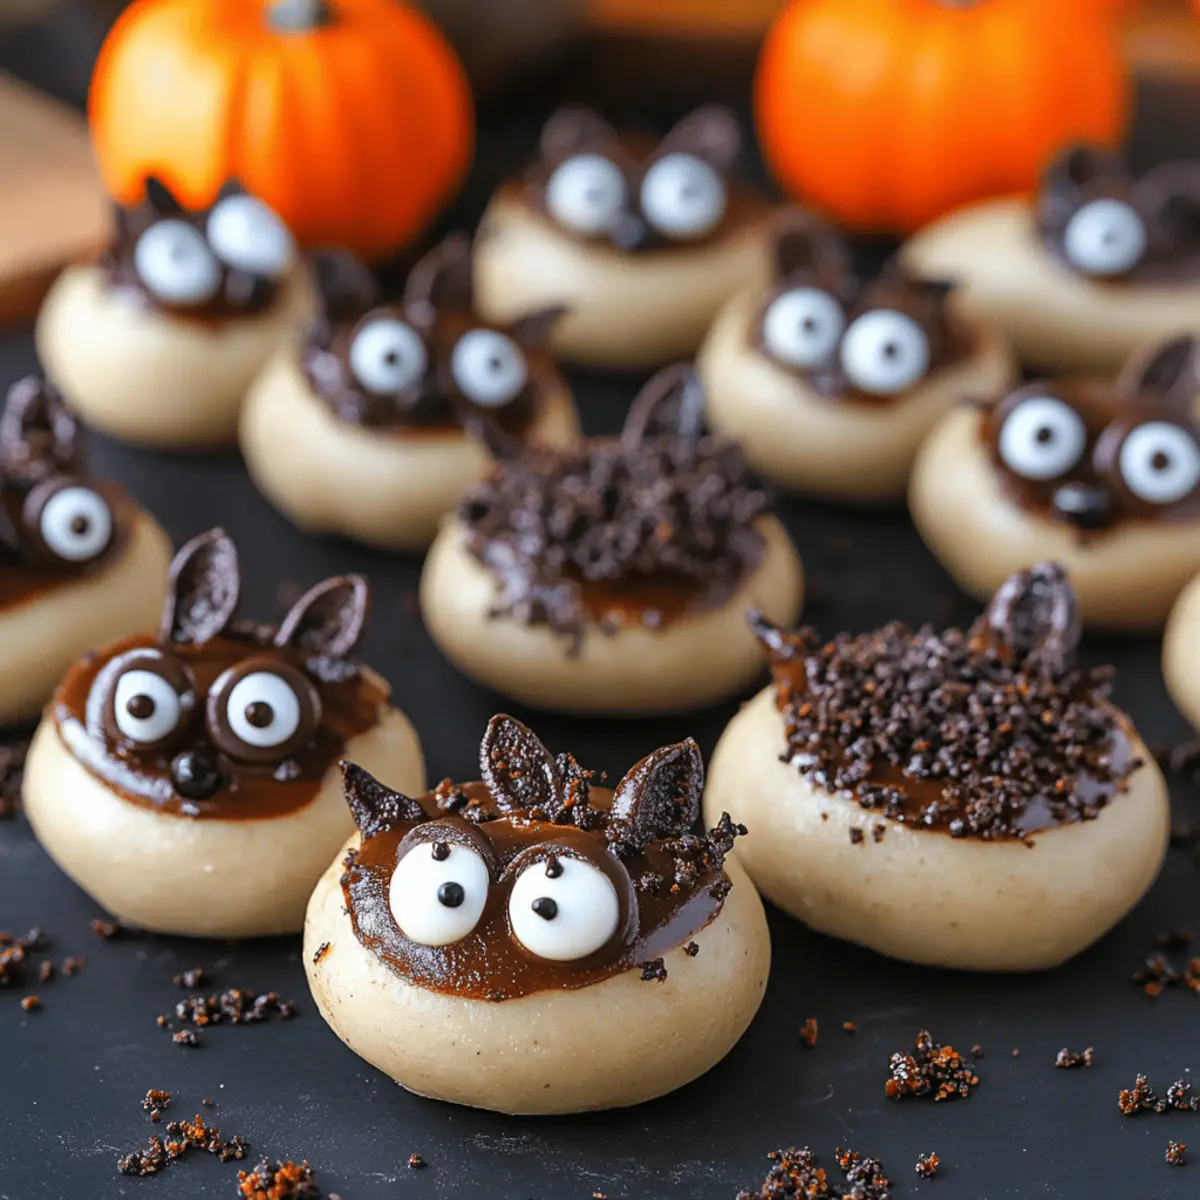
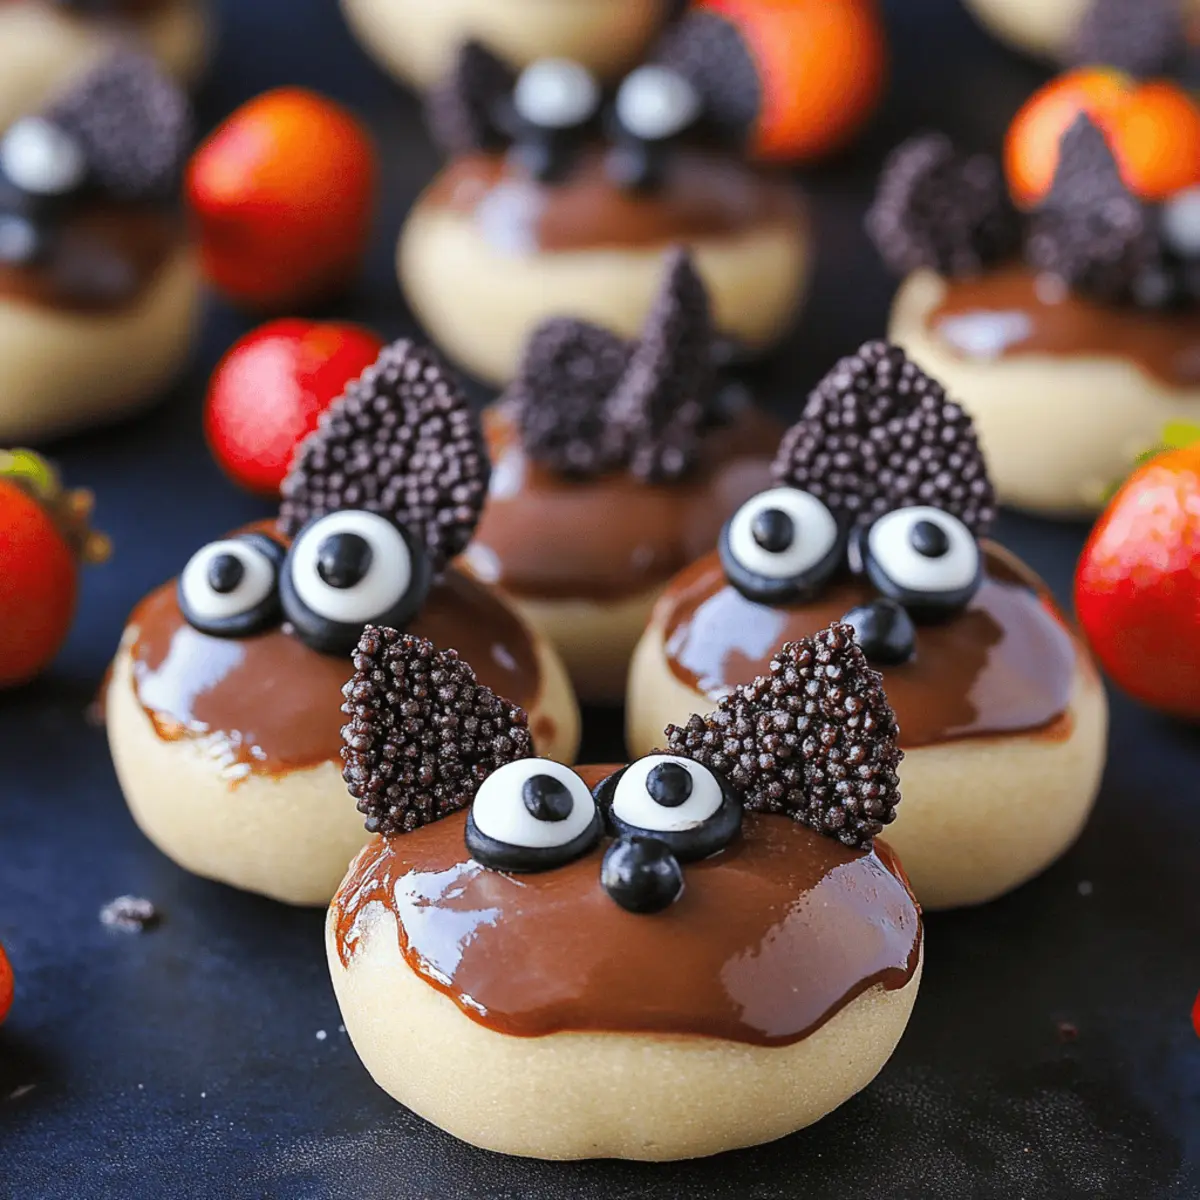
Step 5: Prepare the Bat Wings
While the cookie balls chill, take half of the remaining chocolate sandwich cookies and carefully remove the filling. Next, cut the remaining cookie halves into wing shapes; you’ll need about 30 pairs. Aim for a fun, bat-like shape that will add character to your Oreo Cookie Balls once assembled.
Step 6: Melt the Chocolate Coating
In a microwave-safe bowl, melt 10 oz of chocolate candy coating according to package instructions, typically in 30-second intervals, stirring between each until smooth. Aim for a velvety consistency without lumps. This chocolate coating will ensure your Oreo Cookie Balls have a deliciously sweet outer layer.
Step 7: Dip and Decorate
Carefully dip each chilled cookie ball into the melted chocolate, ensuring they are fully coated. Using a fork, lift them out and gently tap to remove excess chocolate before placing them on parchment paper to set. Work quickly, as you want the chocolate to remain warm for the next step.
Step 8: Attach the Wings
Before the chocolate coating hardens, take two cookie wings and gently press them into the sides of each Oreo Cookie Ball. Hold them for a few seconds to ensure they stay in place. This will give your treats their signature bat appearance, adding both charm and fun.
Step 9: Add Eyes and Ears
Using mini chocolate chips, create adorable eyes and ears on your bat Oreo Cookie Balls. If needed, use a tiny amount of extra melted chocolate to secure them in place. This visual element not only enhances the look but will surely make your cookie balls a hit at any gathering!
Step 10: Store the Treats
Once fully decorated, place your Oreo Cookie Balls back in the fridge to set for about 15 minutes. They can be stored in an airtight container in the refrigerator for up to a week. Enjoy your spooky, delicious creations with family and friends, perfect for any occasion!
How to Store and Freeze Oreo Cookie Balls
Fridge: Store your Oreo Cookie Balls in an airtight container in the fridge for up to 1 week. This keeps them fresh and ready to enjoy any time!
Freezer: For longer storage, freeze the cookie balls in a single layer on a baking sheet. Once frozen, transfer them to a freezer-safe container or bag, keeping them for up to 3 months.
Thawing: To enjoy frozen Oreo Cookie Balls, simply transfer them to the fridge to thaw overnight. They'll hold their delicious taste and texture beautifully!
Reheating: There’s no need to reheat these treats; they are best enjoyed chilled straight from the fridge or thawed from the freezer!
Expert Tips for Oreo Cookie Balls
• Crush with Care: Don’t over-process the cookies; aim for a crumbly texture that holds together well without turning into powder.
• Room Temperature Cream Cheese: Ensure your cream cheese is softened to room temperature for easier mixing and a smoother texture in your Oreo Cookie Balls.
• Chill Thoroughly: Don’t skip the chilling step! A full hour in the fridge ensures your cookie balls hold their shape when being dipped in chocolate.
• Quick Wings Attachment: Work fast when adding wings to the dipped cookie balls; the chocolate hardens quickly, so hold the wings in place for a few seconds for a secure fit.
• Add Personal Touches: Feel free to customize your Oreo Cookie Balls with different toppings, sprinkles, or colored chocolate for special occasions or celebrations!
What to Serve with Bat Oreo Cookie Balls
Indulging in these delightful Bat Oreo Cookie Balls opens up a world of delicious pairings that enhance any gathering’s joy.
-
Chilled Milk: A classic companion, the coolness of milk balances the sweetness, making it a wonderful pairing for your cookie balls.
-
Vanilla Ice Cream: The creamy texture and coldness of vanilla ice cream create a decadent dessert duo, melting perfectly alongside the rich cookie balls.
-
Fruit Salad: A fresh fruit salad adds a light, zesty contrast, making it a refreshing palate cleanser between bites of sweet chocolate.
-
Pumpkin Spice Hot Chocolate: Perfect for fall, this cozy drink complements the chocolate flavors while embracing autumn vibes, warming up your gatherings.
-
Coffee or Espresso: Bold coffee or espresso offers a delightful contrast, enhancing the chocolate while making your dessert experience truly indulgent.
-
Whipped Cream: Adding a dollop of sweetened whipped cream increases the creaminess and offers a visually appealing touch to your cookie balls.
-
Spiced Apple Cider: This warm beverage pairs beautifully with the cookie balls, providing a seasonal twist that everyone will enjoy.
Create your perfect spread and watch as these scrumptious Bat Oreo Cookie Balls become the star of your dessert table!
Oreo Cookie Balls Variations & Substitutions
Want to make your Oreo Cookie Balls even more delicious? Dive into these delightful twists that will elevate your treats!
- Nut-Free: Replace the chocolate candy coating with a combination of dairy-free chocolate chips for a nut-free option.
- Gluten-Free: Use gluten-free chocolate sandwich cookies to enjoy these treats without the worry.
- Minty Delight: Add a few drops of mint extract into the cream cheese mixture for a refreshing twist. It’ll transport your taste buds to a mint-chocolate paradise!
- Spicy Kick: For a surprising heat, mix in a pinch of cayenne pepper or chili powder into the chocolate coating. This unexpected burst of flavor will keep everyone guessing.
- Fruit Infusion: Try adding mini chocolate-covered raisins or chunks of dried fruit to the cookie mixture for a fruity surprise hidden inside.
- Festive Colors: Use colored melting wafers to coat the cookies, perfect for any holiday theme. Imagine bright purple for Halloween or red and green for Christmas!
- Peanut Butter Swirl: Fold in a couple of tablespoons of creamy peanut butter into the cream cheese mixture for a nutty flavor that pairs beautifully with the chocolate. Your friends and family will be asking for more!
- Vegan Twist: Substitute cream cheese with a nut-based cream cheese and opt for vegan chocolate candy coating—it's a delightful vegan treat for everyone to enjoy!
Feel free to mix and match these variations to surprise your taste buds and impress your family! For more fun dessert ideas, don’t forget to check out our Deliciously Unique recipe selection featuring seasonal favorites. Happy baking!
Make Ahead Options
These Bat Oreo Cookie Balls are perfect for meal prep enthusiasts! You can prepare the cookie mixture up to 24 hours in advance; just combine the crushed chocolate sandwich cookies and softened cream cheese as directed, then shape them into balls and refrigerate. When you're ready to finish, dip the chilled cookie balls in melted chocolate and attach the wings and decorations right before serving. This way, your treats will be just as delicious and visually appealing! Additionally, once fully decorated, they can be stored in an airtight container in the fridge for up to a week, making these delights a fantastic, time-saving option for busy weeknights or festive gatherings.

Bat Oreo Cookie Balls Recipe FAQs
What type of cookies should I use for Oreo Cookie Balls?
Absolutely! You want to use classic chocolate sandwich cookies, which are essential for that rich, chocolatey flavor. Standard Oreos work perfectly, but if you want to get adventurous, feel free to try other chocolate sandwich brands. Just ensure they have a similar texture for the best results!
How should I store Oreo Cookie Balls?
Store your Oreo Cookie Balls in an airtight container in the fridge for up to 1 week. This keeps them fresh and ready to enjoy anytime you have a sweet craving! Just make sure they are stored in a single layer to prevent sticking.
Can I freeze Oreo Cookie Balls?
Very! For longer-term storage, you can freeze the cookie balls. Start by placing them in a single layer on a baking sheet and freeze until solid, for about 1-2 hours. Once frozen, transfer them to a freezer-safe container or zip-top bag, where they will last for up to 3 months. Make sure to label the container with the date!
What is the best way to thaw frozen Oreo Cookie Balls?
To thaw your frozen Oreo Cookie Balls, simply place them in the fridge overnight. Allowing them to thaw slowly helps maintain their delicious texture and flavors. You can also enjoy them slightly frozen for a fun twist!
What if my cookie balls are too soft to dip in chocolate?
If your cookie mixture feels too soft, it’s likely that you need more chilling time. Place the shaped cookie balls back in the fridge for an additional 30 minutes to an hour to firm them up. If you need to act quickly, pop them in the freezer for about 15 minutes to get them to the right consistency.
Are Oreo Cookie Balls safe for pets?
No, it's important to note that Oreo Cookie Balls aren't safe for pets. The chocolate in the cookies and candy coating can be toxic to dogs and other animals. Always keep these treats out of reach from your furry friends to ensure their safety!

Irresistible Oreo Cookie Balls for Your Sweet Tooth Cravings
Equipment
- food processor
- Mixing bowl
- Spatula
- tray
- Microwave-safe bowl
Ingredients
For the Cookie Mixture
- 14 oz chocolate sandwich cookies approximately 36 cookies
- 8 oz cream cheese softened
For the Coating
- 10 oz chocolate candy coating e.g., Ghirardelli melting wafers
Instructions
Step-by-Step Instructions for Oreo Cookie Balls
- Crush the cookies in a food processor until fine crumbs.
- Combine crushed cookies with softened cream cheese in a mixing bowl.
- Form mixture into 1-inch balls and lay them out on a parchment-lined tray.
- Chill the tray of cookie balls in the refrigerator for about 1 hour.
- Prepare bat wings by cutting cookie halves into wing shapes.
- Melt the chocolate candy coating in a microwave-safe bowl.
- Dip each cookie ball into the melted chocolate, then place on parchment paper.
- Press the bat wings into the sides of each dipped cookie ball.
- Use mini chocolate chips to add eyes and ears to the cookie balls.
- Refrigerate decorated cookie balls for 15 minutes to set.


Leave a Reply