
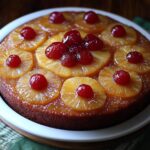
I still get a little flutter of excitement every time I flip a pineapple upside down cake. That moment when you reveal those glistening, caramelized pineapple rings? Pure kitchen magic! This isn't just any old recipe — it's a perfected pineapple upside down cake with a buttery-soft crumb that'll make you want to do a happy dance in your kitchen.
Have you ever bitten into a pineapple upside down cake only to find a soggy center or dry edges? So disappointing, right? Well, put those memories aside. This updated classic solves those common problems with just the right ingredient balance and some simple technique tweaks that make all the difference.
Why You'll Love This Recipe
- No more caramel disasters — the technique prevents that frustrating spillover mess
- Just-right moisture — tender and juicy without turning into a soggy situation
- Extra flavor boost — we're sneaking pineapple juice into the batter (game-changer!)
- Pro-level results with regular pantry ingredients
- Skip the box mix — this from-scratch version tastes a million times better
Recipe Essentials
🕒 Prep Time: 25 minutes
🔥 Cook Time: 45 minutes
⏱️ Total Time: 1 hour, 30 minutes
🍽️ Servings: 8-10 slices
👨🍳 Skill Level: Intermediate
🧰 Essential Tool: 9-inch round cake pan
Ever taken a bite of pineapple upside down cake and wondered, "What makes some so much better than others?" It's all about balance—you need that gorgeous caramelized topping supported by a cake that's sturdy enough to hold it all together, but still tender enough to make you close your eyes with pleasure when you take a bite.
Ingredients for Pineapple Upside Down Cake
For the Caramelized Topping:
- ¼ cup (56g) butter: This melts with the brown sugar to create that irresistible caramel base
- ½ cup (100g) brown sugar: Transforms into that gorgeous, sticky amber coating we all love
- 8-10 pineapple rings: The classic canned ones work perfectly here (from a 20oz can)
- 15-20 maraschino cherries: For that pop of ruby-red color and sweet-tart flavor
For the Cake Batter:
- 1 cup (177g) cake flour: This gives you a softer, more tender crumb than all-purpose
- 1 teaspoon baking powder: Helps your cake rise beautifully
- ¼ teaspoon baking soda: Works with the sour cream for that perfect tenderness
- ½ teaspoon salt: Brings out all the flavors and balances the sweetness
- 6 Tablespoons (85g) unsalted butter: Creates that rich, melt-in-your-mouth texture
- ¾ cup (150g) granulated white sugar: Gives you a finer crumb than using brown sugar
- 2 egg whites: Makes the texture lighter than using whole eggs
- ⅓ cup (80g) sour cream: My secret weapon for incredible moisture and tenderness
- 1 teaspoon vanilla extract: For that warm, aromatic flavor boost
- ¼ cup milk: Adds the right amount of moisture to your batter
- 2 Tablespoons pineapple juice: Infuses subtle fruit flavor throughout every bite
Note: The recipe card below has all the measurements. I've specifically designed this for a 9-inch round cake pan.
How to Make Pineapple Upside Down Cake
Step 1: Prepare Your Oven and Pan
Heat your oven to 350°F (175°C). Make sure your 9-inch round cake pan is clean and completely dry. No need to grease it since we'll create our caramel base directly in there.
Step 2: Create the Caramel Base
Pop ¼ cup butter in your cake pan and place it in the warming oven until it melts (about 5 minutes). Take it out and immediately sprinkle ½ cup brown sugar evenly over the melted butter. Give the pan a gentle tilt to spread it around.
Step 3: Arrange the Fruit Pattern
Pat your pineapple rings dry with paper towels (this helps prevent sogginess later). Arrange them in a single layer over the brown sugar mixture—you'll fit about 7 rings, with one in the center and six around it. Place those bright red cherries in the center of each pineapple ring and tuck a few into any gaps.
Step 4: Prepare the Dry Ingredients
In a medium bowl, whisk together the cake flour, baking powder, baking soda, and salt. This mixes everything evenly and adds a bit of air to the dry ingredients.
Step 5: Cream Butter and Sugar
Grab your electric mixer and beat the softened butter and granulated sugar together on medium-high speed until it's pale and fluffy, about 3-4 minutes. Don't rush this step—it's adding tiny air bubbles that will give your cake that lovely texture.
Step 6: Add Wet Ingredients
Add the egg whites one at a time, beating well after each. Mix in the sour cream and vanilla until smooth. Don't worry if it looks a little curdled—that's normal and will smooth out when you add the flour.
Step 7: Combine Dry and Wet Ingredients
Mix the milk and pineapple juice in a measuring cup. Now add the flour mixture to your butter mixture in three parts, alternating with the milk mixture, starting and ending with flour. Mix on low speed just until combined—overmixing will make your cake tough, and nobody wants that!
Step 8: Pour Batter Over Fruit
Carefully spoon the batter over your pretty pineapple arrangement. Try not to disturb the pattern (I know, it's tempting to peek!). Spread the batter evenly with an offset spatula or the back of a spoon. Give the pan a few gentle taps on the counter to release any air bubbles.
Step 9: Bake to Golden Perfection
Bake in your preheated oven for 43-47 minutes. You'll know it's done when a toothpick poked into the center comes out mostly clean with just a few moist crumbs. The top will be golden brown and should spring back when you gently press it.
Step 10: Cool Briefly
Let the cake cool in the pan on a wire rack for exactly 10 minutes—set a timer! This timing is crucial—too short and the caramel will be too runny, too long and it'll stick to the pan like glue.
Step 11: The Perfect Flip
After 10 minutes, run a thin knife around the edges to loosen it. Place your serving plate upside down over the cake pan. Take a deep breath, then quickly flip the pan and plate together in one confident motion. Let the pan sit for about 30 seconds to allow all that yummy caramel to drizzle down, then lift it off.
Step 12: Serve and Enjoy
Let your masterpiece cool for another 30 minutes before slicing. This cake is absolutely divine while still slightly warm, when the caramel topping is all gooey and perfect.
Texture and Final Result
When you cut into this cake, you'll see why it's worth the effort. The top (originally the bottom) showcases those glossy, amber-colored pineapple rings and bright cherries, all nestled in a sticky-sweet caramel that gets just a bit chewy around the edges.
The cake itself has this wonderful buttery crumb that's a bit more substantial than a fluffy layer cake but still so tender it practically melts in your mouth. My favorite part? That very top layer of cake that gets infused with fruity caramel, creating this amazing moisture gradient through each slice.
Each bite gives you this perfect balance of sweet, fruity notes with rich, buttery cake. The sour cream adds just enough tang to keep it from being too sweet, while that pineapple juice in the batter ties everything together beautifully.
Expert Tips for Success
- Pat that pineapple dry: Take a minute to blot excess moisture from your pineapple. Your future self will thank you when your cake isn't soggy!
- Room temperature ingredients matter: Cold butter and eggs don't play nice with others. Let them warm up for the smoothest batter.
- Don't go overboard with creaming: Beat the butter and sugar until fluffy, but stop before it gets too white—over-creaming can make your cake rise too much then collapse like a sad soufflé.
- The 10-minute cooling rule is sacred: Set a timer! Too short and your cake falls apart; too long and the caramel glues itself to the pan.
- Be confident when flipping: Hesitation leads to half the cake staying in the pan. Channel your inner chef and flip with conviction!
- Worried about sticking? You can place a piece of parchment in the bottom of the pan after the butter melts but before adding brown sugar.
- Live in the mountains? If you're above 3,500 feet, reduce sugar by 1 tablespoon and bump up your oven temperature by 25°F.
Storage & Make-Ahead
Let's be honest—this cake is at its absolute best on the day you make it. Those first few hours after baking? Pure magic.
- Same-day serving: Just leave it uncovered at room temperature if serving within 8 hours.
- Overnight storage: Cover loosely with foil and keep at room temperature for up to 1 day. The pineapple might sink in a bit, but it'll still taste amazing.
- Longer storage: If you must, cover and refrigerate for up to 3 days. Let it come back to room temperature before serving, or warm individual slices for 15 seconds in the microwave.
- Freezing for later: You can freeze this beauty for up to 2 months. Wrap it tightly in plastic wrap and then foil. Thaw overnight in the fridge before bringing to room temperature.
Variations & Customizations
Peach Upside Down Cake
Swap in fresh peach slices (about 2-3 peaches, thinly sliced) instead of pineapple rings. Pat them dry and arrange them in a pretty overlapping pattern. Skip the cherries or use fresh cherry halves instead.
Mini Pineapple Upside Down Cakes
Make individual servings in a jumbo muffin tin using pineapple chunks or tidbits. These bake faster—check them at around 18-20 minutes.
Pineapple-Coconut Upside Down Cake
Add ⅓ cup shredded coconut to your batter and use coconut milk instead of regular milk for a tropical twist. A touch of coconut extract (¼ teaspoon) takes it to the next level.
Brown Butter Variation
Want to get fancy? Brown the butter for both the topping and cake before using. It adds this amazing nutty flavor that works wonders with the caramelized topping.
Serving Suggestions
- The classic move: Serve slightly warm with a scoop of vanilla ice cream melting over the top. The hot-cold contrast is simply dreamy.
- Brunch star: Pair with fresh fruit and coffee for an impressive addition to your brunch spread.
- Dinner party finale: Drizzle with a little rum sauce or add a dollop of lightly whipped cream for extra wow factor.
- Seasonal twist: In summer, serve with fresh berries on the side; in fall, add a dash of cinnamon to the batter and serve with spiced whipped cream.
Recipe Background
Pineapple upside down cake first became a hit in 1920s America after canned pineapple made tropical fruit available to home cooks everywhere. The genius design—baking caramelized fruit on the bottom and then flipping it—creates this beautiful decorated cake with zero frosting skills required!
This recipe takes that classic and makes it even better with specific improvements: cake flour for tenderness, egg whites for lightness, and sour cream for moisture without heaviness.
FAQs about Pineapple Upside Down Cake
Do you flip a pineapple upside down cake when it's hot or cold?
You want to flip when it's warm but not hot—right at that 10-minute cooling mark. Too soon and it'll fall apart; too late and the caramel hardens and sticks. That sweet spot at 10 minutes gives you a set structure with caramel that's still fluid enough to release from the pan.
What cake mix do you use for pineapple upside down cake?
While I'm team scratch-baking for this recipe, you can use a yellow cake mix in a pinch. Add a teaspoon of vanilla and replace the water with pineapple juice for better flavor. But honestly? The homemade batter is so much better—it gives you that perfect texture that supports the fruit without getting soggy.
What's the trick to flipping pineapple upside down cake?
Confidence is key! After that 10-minute cooling period, run a knife around the edges, put your serving plate face-down on top, and then flip quickly and decisively. Keep holding them together for about 30 seconds to let the caramel drizzle down, then lift the pan. A plate with a slight lip helps catch any runaway caramel.
Can I use pineapple juice instead of water in a cake mix?
Absolutely! It's actually a brilliant swap. The juice infuses your cake with subtle fruit flavor that perfectly complements the topping. We use juice from the canned pineapple rings in our scratch recipe, and it works just as well with boxed mixes. This simple change makes the whole cake taste more cohesive and flavorful.
This pineapple upside down cake takes humble ingredients and transforms them into something truly special. There's something so satisfying about making a dessert that's both nostalgic and impressive at the same time.
Have you ever made pineapple upside down cake before? What's your favorite part—that glistening caramelized topping or the tender cake underneath? Drop me a comment below—I'd love to hear about your experiences!
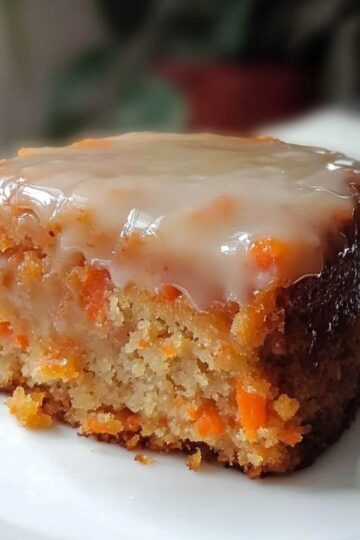
For another classic cake that never disappoints, check out my Carrot Cake Recipe with Cream Cheese Frosting.
PrintHomemade Pineapple Upside Down Cake: Ultra-Moist With Perfect Caramelized Topping
This homemade pineapple upside down cake recipe is ultra-moist with a perfect caramelized topping, featuring a buttery-soft crumb and a balance of flavors that avoids soggy centers or dry edges.
- Prep Time: 25 minutes
- Cook Time: 45 minutes
- Total Time: 1 hour, 30 minutes
- Yield: 8-10 slices 1x
- Category: Dessert
- Method: Baking
- Cuisine: American
- Diet: Vegetarian
Ingredients
- ¼ cup (56g) butter
- ½ cup (100g) brown sugar
- 8-10 pineapple rings
- 15-20 maraschino cherries
- 1 cup (177g) cake flour
- 1 teaspoon baking powder
- ¼ teaspoon baking soda
- ½ teaspoon salt
- 6 Tablespoons (85g) unsalted butter
- ¾ cup (150g) granulated white sugar
- 2 egg whites
- ⅓ cup (80g) sour cream
- 1 teaspoon vanilla extract
- ¼ cup milk
- 2 Tablespoons pineapple juice
Instructions
- Heat your oven to 350°F (175°C) and prepare your cake pan.
- Create the caramel base by melting butter and adding brown sugar.
- Arrange pineapple rings and cherries over the caramel base.
- In a bowl, whisk cake flour, baking powder, baking soda, and salt.
- Cream butter and sugar until pale and fluffy.
- Add egg whites, then mix in sour cream and vanilla.
- Combine dry ingredients with wet mixture, alternating with milk and pineapple juice.
- Spoon batter over the fruit arrangement and spread evenly.
- Bake for 43-47 minutes until done.
- Let cool for 10 minutes on a wire rack.
- Flip the cake onto a plate after loosening the edges.
- Let cool for 30 minutes before slicing and serving.
Notes
- Pat the pineapple dry to avoid sogginess.
- Use room temperature ingredients for better mixing.
- Avoid over-creaming butter and sugar to prevent cake collapse.
- Follow the 10-minute cooling rule for easier flipping.
- Bake at 25°F higher if you live over 3,500 feet elevation.
Nutrition
- Serving Size: 1 slice
- Calories: 290
- Sugar: 27g
- Sodium: 210mg
- Fat: 13g
- Saturated Fat: 7g
- Unsaturated Fat: 5g
- Trans Fat: 0g
- Carbohydrates: 41g
- Fiber: 1g
- Protein: 3g
- Cholesterol: 35mg
Keywords: pineapple upside down cake, homemade cake, caramelized topping, moist cake, dessert recipe
Leave a Reply