
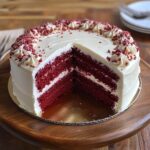
I still remember the first time I sliced into a perfectly made red velvet cake recipe. The dramatic crimson layers against that snow-white frosting stopped me in my tracks. But let me tell you, that first bite is what truly won me over. The soft, velvety texture, those subtle cocoa undertones, and that slightly tangy finish. create a flavor memory that sticks with you long after you've licked the last crumb from your fork.
This isn't just vanilla cake wearing red food coloring. Not even close! It's a carefully crafted dessert with a flavor profile all its own and that melt-in-your-mouth texture that makes red velvet fans swoon. The magic happens when you whip those egg whites separately—that's the technique that creates the impossibly soft crumb that gives this beloved cake its name.
Why You'll Love This Recipe
- That dreamy, velvety texture – Whipping the egg whites separately creates that "Ah, now THIS is red velvet" mouthfeel that'll make you close your eyes in appreciation
- Flavors that dance together – A little cocoa, warm vanilla notes, and that buttermilk tang create something completely irresistible
- Jaw-dropping looks – Those ruby-red layers paired with cloud-like frosting make people's eyes widen when you bring it to the table
- Step-by-step guidance – Even if this is your first red velvet rodeo, you've got this! The instructions have your back
Recipe Essentials
🕒 Time: Prep: 40 mins · Bake: 30 mins · Cool: 1.5 hrs · Total: 3 hrs
🍽️ Yield: 12 generous servings
👨🍳 Skill Level: Intermediate
🧰 Essential Tools: 9-inch cake pans, parchment paper, electric mixer, cooling rack
Ingredients for Red Velvet Cake
For the Cake Layers:
- 3 cups (360g) cake flour: Creates that tender, fine crumb that makes you go "mmm"
- 1 teaspoon baking soda: Gives your cake the perfect rise when it meets the acidic ingredients
- 2 tablespoons (10g) unsweetened natural cocoa powder: Delivers that hint of chocolate (skip the Dutch-processed!)
- ½ teaspoon salt: Brings out all the flavors and balances the sweetness
- ½ cup (113g) unsalted butter, room temperature: Adds richness and that buttery goodness
- 2 cups granulated sugar: Sweetens and helps keep everything moist
- 1 cup vegetable oil: This is why your cake stays incredibly tender days later
- 4 large eggs, separated and at room temperature: The yolks add richness while the whites create magic
- 1 tablespoon pure vanilla extract: Adds that warm, aromatic sweetness we all love
- 1 cup buttermilk, room temperature: Brings the tang and helps with the rise
- 1 teaspoon distilled white vinegar: Works with the baking soda for the perfect lift
- Red food coloring: For that signature color (gel works best for vibrant color)
For the Cream Cheese Frosting:
- 16 ounces (452g) brick-style cream cheese, softened: The tangy foundation (don't grab the tub stuff—it won't work right)
- ¾ cup (170g) unsalted butter, room temperature: Gives stability and silky texture
- 5 cups (600g) confectioners' sugar: Sweetens and builds the right consistency
- 1 teaspoon pure vanilla extract: Makes everything taste better
- Pinch of salt: Cuts through the sweetness and makes flavors pop
Full measurements in the recipe card below
How to Make Red Velvet Cake
Step 1: Prepare Your Workspace Heat up your oven to 350°F (177°C). Grease two 9-inch cake pans, then line the bottoms with parchment circles, and grease those too. Trust me—this double-duty prep means your cake layers will slide right out without a fight.
Step 2: Mix Dry Ingredients Grab a medium bowl and whisk together the cake flour, cocoa powder, baking soda, and salt until everything's well mixed. This simple step prevents those awful pockets of bitterness or saltiness that can ruin a bite.
Step 3: Cream Butter and Sugar In your mixer bowl with the paddle attachment (or use a hand mixer if that's what you've got), beat the butter until it's creamy—about a minute. Add sugar and beat on high for 3-4 minutes until it looks light and fluffy. Don't rush this part! That extra beating time creates tiny air pockets that make your cake lighter.
Step 4: Add Wet Ingredients Drop your mixer speed to medium-low and slowly pour in the oil, mixing until it's fully incorporated. Add those egg yolks one at a time, beating well after each. Stir in the vanilla. Your mixture should look smooth and uniform—almost like a really thick cake batter.
Step 5: Alternate Dry Ingredients and Buttermilk With the mixer on low, add your dry ingredients in three batches, alternating with buttermilk. Start with dry and end with dry. Mix just until combined after each addition. Over-mixing now would make your cake tough—nobody wants that!
Step 6: Add Color and Acid Stir in the vinegar, then add enough red food coloring to get that vibrant red color. Don't worry if it looks super dark—the finished cake will be brighter.
Step 7: Whip the Egg Whites Here's where the magic happens! In a clean, dry bowl with clean beaters (any greasy residue will ruin this step), beat those egg whites on high speed until they form soft, fluffy peaks. They should hold their shape but have slightly droopy tips when you lift the beater.
Step 8: Fold in Egg Whites Using a large rubber spatula, gently fold the whipped egg whites into your batter. Use a down-across-up-and-over motion. Keep folding until no white streaks remain, but be gentle—we want to keep all that air you just whipped in. This is the step that creates that velvety texture we're after!
Step 9: Bake the Cakes Divide your batter evenly between the pans. Slide them into the preheated oven for 28-32 minutes. You'll know they're done when a toothpick comes out with just a few moist crumbs, the cake springs back lightly when touched, and it's starting to pull away from the sides.
Step 10: Cool Completely Let the cakes cool in their pans on a wire rack for 10 minutes. Then run a knife around the edges, flip them onto the racks, peel off the parchment, and let them cool completely—about 1-2 hours. Patience pays off here—frost too soon and you'll have a melty mess!
Step 11: Prepare the Cream Cheese Frosting Beat the cream cheese and butter together on medium-high speed until smooth and creamy—about 2 minutes. Add the confectioners' sugar, vanilla, and salt. Start mixing on low (unless you want to redecorate your kitchen with a sugar snowstorm), then increase to high speed and beat for 3 minutes until it's completely smooth and fluffy.
Step 12: Assemble and Frost Place one cake layer on your serving plate. Spread about 1½ cups of frosting evenly on top. Place the second layer on top and spread the remaining frosting over the top and sides. For a smooth finish, try this baker's trick: warm your offset spatula under hot water, dry it off, then glide it over the frosting.
Step 13: Chill Before Serving Pop the frosted cake in the fridge for 30-60 minutes before serving if you want clean, photo-worthy slices. Then let it sit at room temperature for 15-20 minutes before serving—the flavors come alive when it's not cold.
Texture and Final Result
When you nail this cake, it delivers something truly special. The crumb structure feels almost otherworldly—somehow both substantial and delicate at once, like velvet fabric against your tongue. Each bite offers a gentle resistance before melting away, leaving those lingering notes of vanilla, subtle cocoa, and that pleasant tang that makes you go back for another forkful.
The cream cheese frosting is the perfect partner—silky smooth with balanced sweetness and that distinctive tang that cuts through the richness of the cake. When you see those ruby-red layers against the snow-white frosting, you'll understand why people gasp when you cut the first slice.
Expert Tips for Success
- Don't skip the egg white technique – It might seem fussy, but separately whipping those whites is what creates the texture that makes people say "wow"
- Room temperature ingredients really matter – Cold ingredients won't mix properly, and your cake will end up dense and uneven
- Measure flour like a pro – Spoon it into measuring cups and level with a knife rather than scooping directly, which packs it down
- Treat the batter gently after adding flour – Overmixing develops gluten and makes cake tough
- Want natural coloring? – Try 2-3 tablespoons of beet powder for a more burgundy (but still beautiful) hue
- Frosting too soft? – Pop it in the fridge for 20 minutes before decorating and your piping will hold its shape
Storage & Make-Ahead
Room temperature: Your frosted masterpiece will be fine at cool room temperature for up to 1 day.
Refrigerator: Cover any leftover cake and refrigerate for up to 5 days. Pro tip: press plastic wrap against any cut edges to keep them from drying out.
Freezer: You can freeze unfrosted cake layers wrapped tightly in plastic for up to 3 months. Let them thaw overnight in the fridge before frosting. For frosted cake, you can freeze slices or the whole cake (if you've got the freezer space). Freeze it uncovered until firm, then wrap tightly and freeze for up to 2 months.
Make ahead: You can make the cake layers up to 2 days ahead. Just wrap them in plastic and keep at room temperature. The frosting can be made a day ahead and stored covered in the fridge. Let it come to room temperature before spreading.
Variations & Customizations
Red Velvet Cupcakes: Fill lined cupcake pans ⅔ full and bake for 20-22 minutes. You'll get about 24 cupcakes.
Naturally Colored Red Velvet: Use 2-3 tablespoons of beet powder instead of food coloring. The color will be more burgundy than bright red, but the flavor stays the same.
No-Dye Red Velvet: Skip the coloring entirely for a lovely light brown "cocoa velvet" cake with all the same amazing texture and flavor.
Southern-Style Red Velvet: For a more traditional Southern approach, try ermine frosting (also called boiled milk frosting) instead of cream cheese.
Serving Suggestions
Red velvet cake shines as the centerpiece at birthdays, anniversaries, and Valentine's Day celebrations. For an extra-special presentation, add some fresh berries, chocolate curls, or crushed pecans around the base.
For a truly Southern experience, serve with a glass of cold milk or sweet tea. At holiday gatherings, pair slices with coffee or dessert wines like port or late-harvest Riesling.
The Cultural Significance of Red Velvet Cake
Red velvet cake goes way back to the Victorian era, when "velvet" cakes were known for their fine, soft texture. The "red" part became popular in the 1930s when Adams Extract Company, trying to boost sales during the Great Depression, promoted their red food coloring with a red velvet cake recipe as a clever marketing move.
In recent years, red velvet cake has become important in Juneteenth celebrations. The vibrant red color symbolizes the bloodshed and resilience of enslaved people fighting for freedom, making it a meaningful dessert for this important holiday commemorating the end of slavery in the United States.
FAQs about Red Velvet Cake
What is the flavor of red velvet cake?
Red velvet has a flavor all its own that's often misunderstood. It's definitely not just chocolate cake wearing red food coloring! Authentic red velvet has a mild chocolate flavor (from just a touch of cocoa powder), notes of vanilla, buttery richness, and that distinctive tang from buttermilk and vinegar. The flavor is intentionally subtle because it's meant to let the velvety texture and cream cheese frosting shine through.
What makes a cake a red velvet cake?
Three key elements define true red velvet cake: 1) That specific mix of cocoa powder, buttermilk, and vinegar that creates both color and texture, 2) The signature red color (traditionally enhanced with food coloring), and 3) That distinctively soft "velvet" texture, which comes from the reaction between the acidic ingredients and the separate egg white whipping technique. Without these elements—especially that texture—it's just not authentic red velvet.
Is a red velvet cake just a chocolate cake?
Not at all! While red velvet does contain cocoa powder, it uses much less than a chocolate cake (typically just 2-3 tablespoons compared to the ½-1 cup in chocolate cake). Red velvet also relies on buttermilk and vinegar for both flavor and texture, and the egg preparation method is completely different. The result? A much subtler cocoa flavor and an entirely different texture than chocolate cake.
What does red velvet cake have to do with Juneteenth?
Red velvet cake has become a meaningful dessert for Juneteenth celebrations because of its vibrant red color. Red foods are traditionally served during Juneteenth to represent the bloodshed and sacrifice of enslaved people. Additionally, red drinks and foods were brought to America during the transatlantic slave trade, connecting to West African culinary traditions. While red velvet wasn't created specifically for Juneteenth, it's been embraced as a powerful symbol that honors both the hardship and resilience in African American history.
This red velvet cake is more than just another dessert recipe—it's a little piece of culinary magic that's stood the test of time. The extra care you put into the technique rewards you with something truly special. I've seen skeptics take one bite and suddenly become die-hard red velvet fans!
If you fall in love with this cake (and I think you will), you might also enjoy our Pineapple Upside Down Cake for another classic American dessert that never goes out of style!
PrintUltimate Red Velvet Cake with Cream Cheese Frosting
The Ultimate Red Velvet Cake with Cream Cheese Frosting is a carefully crafted dessert with a unique flavor profile and velvety texture. This classic recipe delivers soft crimson layers with subtle cocoa undertones and a slightly tangy finish, topped with a silky cream cheese frosting.
- Prep Time: 40 mins
- Cook Time: 30 mins
- Total Time: 3 hrs
- Yield: 12 generous servings 1x
- Category: Dessert
- Method: Baking
- Cuisine: American
- Diet: Vegetarian
Ingredients
- 3 cups (360g) cake flour
- 1 teaspoon baking soda
- 2 tablespoons (10g) unsweetened natural cocoa powder
- ½ teaspoon salt
- ½ cup (113g) unsalted butter, room temperature
- 2 cups granulated sugar
- 1 cup vegetable oil
- 4 large eggs, separated and at room temperature
- 1 tablespoon pure vanilla extract
- 1 cup buttermilk, room temperature
- 1 teaspoon distilled white vinegar
- Red food coloring
- 16 ounces (452g) brick-style cream cheese, softened
- ¾ cup (170g) unsalted butter, room temperature
- 5 cups (600g) confectioners' sugar
- 1 teaspoon pure vanilla extract
- Pinch of salt
Instructions
- Prepare Your Workspace: Heat your oven to 350°F (177°C). Grease two 9-inch cake pans, line with parchment, and grease again.
- Mix Dry Ingredients: Whisk together flour, cocoa powder, baking soda, and salt.
- Cream Butter and Sugar: Beat the butter until creamy. Add sugar and beat until light and fluffy.
- Add Wet Ingredients: Gradually add oil, then egg yolks, and vanilla, mixing until smooth.
- Alternate Dry Ingredients and Buttermilk: Combine dry ingredients with buttermilk in three batches, mixing gently.
- Add Color and Acid: Stir in vinegar and enough red food coloring to achieve a vibrant red.
- Whip the Egg Whites: Beat the egg whites until soft peaks form.
- Fold in Egg Whites: Gently fold whipped egg whites into the batter.
- Bake the Cakes: Divide batter into pans and bake for 28-32 minutes.
- Cool Completely: Cool in pans for 10 minutes, then finish on a wire rack.
- Prepare the Cream Cheese Frosting: Beat cream cheese and butter until smooth, then add confectioners' sugar, vanilla, and salt.
- Assemble and Frost: Layer cakes and frost with cream cheese frosting.
- Chill Before Serving: Refrigerate the cake for clean slices and allow it to come to room temperature before serving.
Notes
- Don't skip the egg white technique for that velvety texture.
- Room temperature ingredients ensure proper mixing.
- Measure flour correctly to avoid packing.
- Treat the batter gently post-flour addition.
- For natural coloring, use beet powder.
- If frosting is too soft, chill before decorating.
Nutrition
- Serving Size: 1 slice
- Calories: 520
- Sugar: 46g
- Sodium: 280mg
- Fat: 28g
- Saturated Fat: 12g
- Unsaturated Fat: 14g
- Trans Fat: 0g
- Carbohydrates: 63g
- Fiber: 1g
- Protein: 5g
- Cholesterol: 75mg
Keywords: Red Velvet Cake, Cream Cheese Frosting, Dessert, Baking, Cake, American, Classic

Leave a Reply