
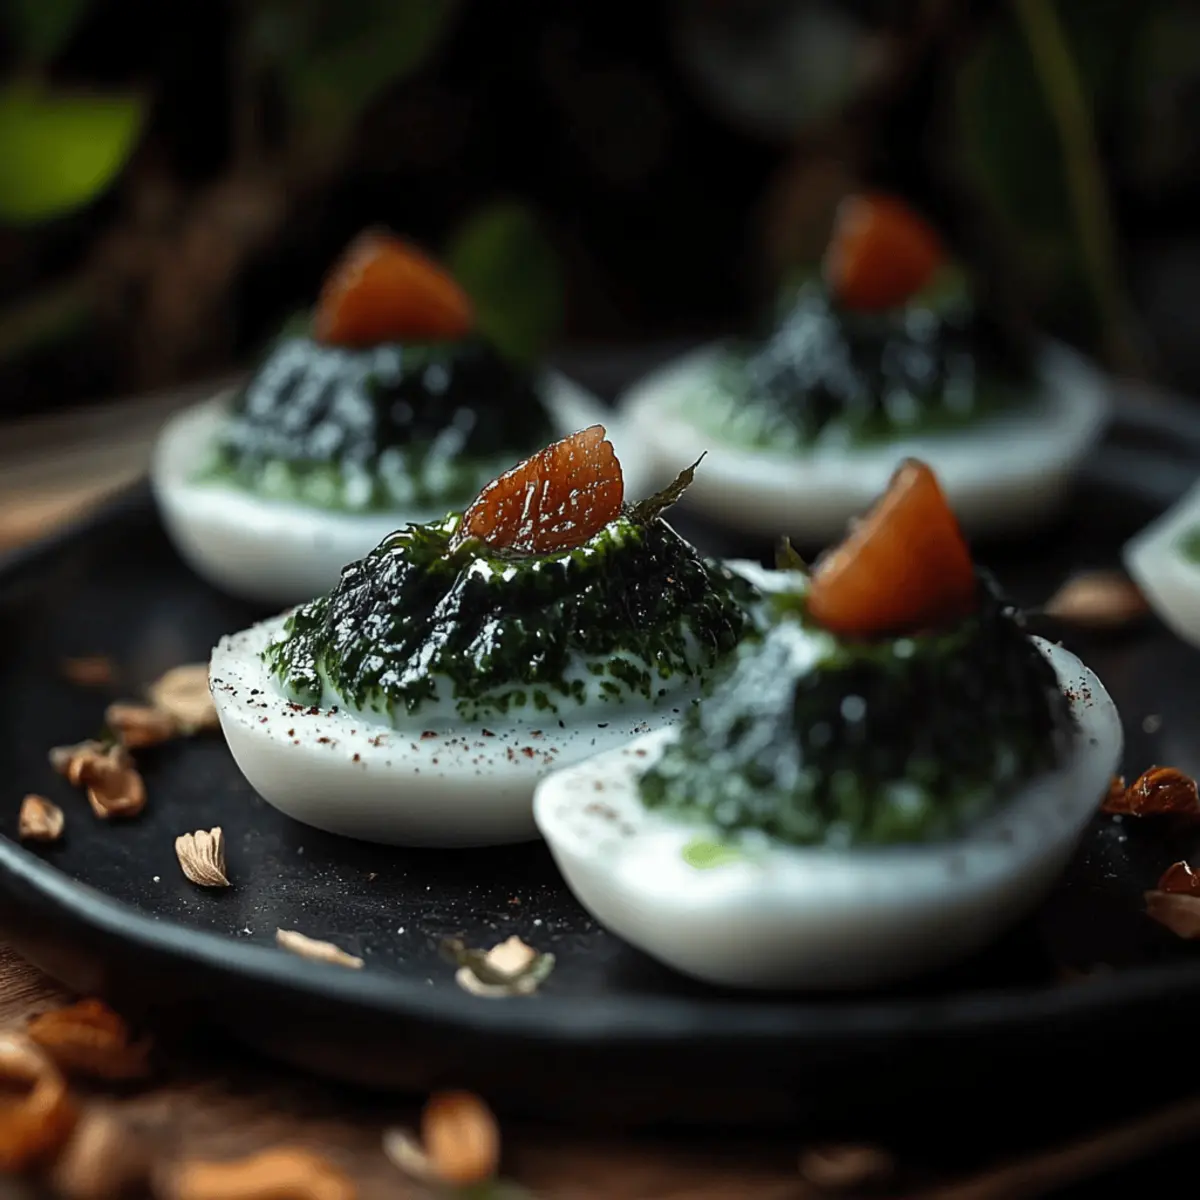
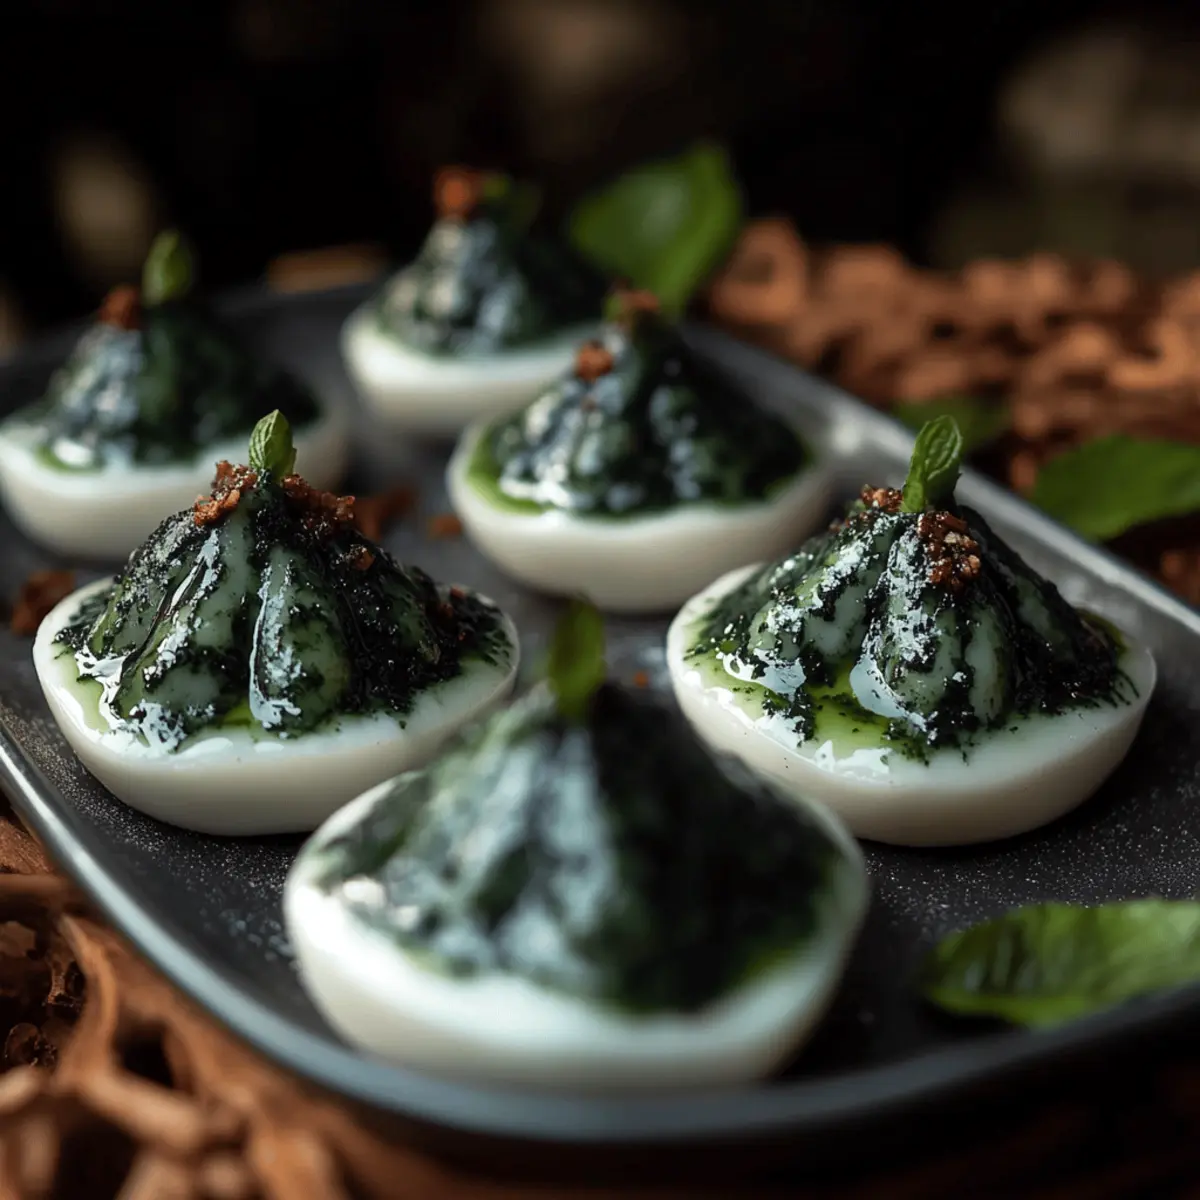
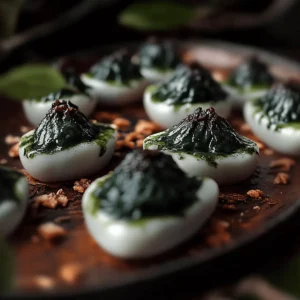
As I prepared for this year’s Halloween party, the idea of serving spooky yet surprisingly vibrant Swamp Eggs—our Halloween Deviled Eggs—made my heart race with excitement! With just a few clever tricks, these naturally dyed treats not only steal the show but also bring a healthy twist to your celebration. By using thawed blueberries for that eerie greenish-blue hue and a touch of liquid chlorophyll, your table will burst with color while staying deliciously nutritious. These deviled eggs are quick to whip up and guaranteed to leave your guests both impressed and delighted, making them the perfect addition to a festive spread. Curious how to make these enchanting little bites come to life? Let’s dive in!
Why are These Halloween Deviled Eggs Unique?
Vibrant, Natural Colors: The use of thawed blueberries for dye makes these eggs not only spooky but also visually stunning.
Healthy Twist: Packed with nutritious ingredients, these deviled eggs use liquid chlorophyll, making them a guilt-free treat.
Simple Steps: With just a few easy steps, you'll create a dish that appears impressive but is straightforward to prepare.
Crowd-Pleasing Flavors: The blend of fresh herbs like dill and chives combined with creamy filling is sure to enchant your guests.
Perfect for Any Occasion: While fantastic for Halloween, these eggs can easily be adapted for other festive gatherings or parties.
Halloween Deviled Eggs Ingredients
Get ready to concoct a spooky delight!
For the Eggs
- 12 large eggs – Choose large eggs for the perfect size to showcase your colorful filling.
For the Blueberry Dye
- 1 ½ cups frozen blueberries, thawed – The blueberries provide a natural dye that's both eerie and vibrant.
- 1 ½ cups hot water – Hot water helps extract the color from the blueberries effectively.
- 3 tablespoons distilled white vinegar – Vinegar enhances the dye's effectiveness, ensuring a bold color for your Halloween deviled eggs.
For the Filling
- 12 large egg yolks – Use the yolks from the dyed eggs for a cohesive flavor and color.
- 9 tablespoons mayonnaise – Adds creaminess and richness to balance the flavors.
- 2 tablespoons liquid chlorophyll – Infuses an extra layer of healthiness and a stunning green hue.
- ¼ teaspoon salt – Enhances the overall flavor of the filling.
- ¼ teaspoon black pepper – A pinch of spice to elevate the taste.
- 3 tablespoons minced fresh dill – Brings a refreshing, herbal note that pairs beautifully with eggs.
- 2 tablespoons minced fresh chives – Adds a mild onion flavor for an extra kick.
- 1 large clove garlic, crushed – Provides a hint of boldness to your creamy mixture.
For Garnish
- ½ tablespoon poppy seeds – Sprinkle for a lovely finishing touch that enhances both appearance and texture.
Step‑by‑Step Instructions for Halloween Deviled Eggs
Step 1: Hard-Boil the Eggs
Begin by placing 12 large eggs in a pot and cover them with water. Bring the water to a boil over medium-high heat, then once boiling, cover the pot and reduce the heat to low. Let the eggs cook for 12 minutes, ensuring they are fully hard-boiled. Once done, transfer the eggs to an ice bath to cool completely for about 10-15 minutes.
Step 2: Prepare the Blueberry Dye
While the eggs cool, prepare your spooky dye for the Halloween Deviled Eggs. In a bowl, combine 1 ½ cups of thawed blueberries with 1 ½ cups of hot water and 3 tablespoons of distilled white vinegar. Stir well to mix and allow the vibrant color to infuse while you get ready to dye the eggs in the next step.
Step 3: Create the Crackled Effect
Once the eggs are fully cooled, gently tap each egg on a hard surface to create a crackled effect. Be careful not to break the shells completely; just enough to create fine cracks that allow the dye to seep in. This fun technique adds an eerie texture to your Halloween Deviled Eggs, making them spooky and visually interesting.
Step 4: Dye the Eggs
Submerge the cracked eggs in the blueberry dye mixture you made earlier. Leave them to soak for at least 1 hour or until you achieve your desired color intensity. Keep an eye on the color; the longer they soak, the more dramatic the effect. The result will be beautifully dyed shells that give these eggs their unique Halloween spirit.
Step 5: Peel the Eggs
After dyeing, carefully remove the eggs from the dye and gently peel them under cool running water. As you peel, the cracks will reveal a stunning crackled design that adds to the spooky charm of your Halloween Deviled Eggs. Set the peeled egg whites aside on a serving platter, ready to be filled.
Step 6: Prepare the Filling
In a mixing bowl, combine the yolks from the dyed eggs, 9 tablespoons of mayonnaise, 2 tablespoons of liquid chlorophyll, ¼ teaspoon of salt, ¼ teaspoon of black pepper, 3 tablespoons of minced fresh dill, 2 tablespoons of minced fresh chives, and 1 crushed garlic clove. Mix everything together until smooth and creamy, creating a flavorful filling for your Halloween Deviled Eggs.
Step 7: Fill the Egg Whites
Using a spoon or piping bag, carefully fill each cracked egg white with the creamy yolk mixture. Make sure to fill them generously to create a deliciously hefty bite. This is where the fun begins—look at the colorful mixtures against the spooky shell, and revel in the creativity that comes with making these Halloween Deviled Eggs!
Step 8: Garnish and Serve
To finish off your Halloween Deviled Eggs, sprinkle a pinch of poppy seeds over the top of each filled egg. This adds a delightful crunch and an extra layer of visual appeal. Serve your beautifully crafted eggs on a festive platter, attracting everyone's attention and ready to be devoured at your spooky celebration.

Expert Tips for Halloween Deviled Eggs
-
Dye Duration: Soak your eggs longer for a bolder hue. Give them at least 1 hour, but up to 3 hours for a truly vibrant look!
-
Cracking Technique: Tap gently to achieve fine cracks. If you break the shell too much, the dye can seep out and lessen the spooky effect.
-
Creamy Consistency: Ensure your filling is smooth by mixing the ingredients well. A good combination prevents lumps that can detract from the flavor of your Halloween Deviled Eggs.
-
Storage Tips: If you’re preparing ahead of time, store the dyed eggs unfilled in the fridge. Fill them closer to serving time for the freshest taste and appearance.
-
Herb Variations: Feel free to swap in other fresh herbs based on your preference! Basil or parsley could add a delightful twist to your Halloween deviled eggs.
What to Serve with Swamp Eggs?
As you prepare to dazzle your guests with these vibrant treats, consider a few delicious companions to create an unforgettable meal.
-
Crispy Sweet Potato Fries: The sweetness and crunch of these fries create a delightful contrast to the creamy texture of the deviled eggs. They're always a hit with both kids and adults alike.
-
Zesty Green Salad: A fresh, tart salad with citrus vinaigrette complements the richness of the eggs, adding a refreshing balance. Toss in some seasonal veggies for a colorful presentation.
-
Spooky Halloween Punch: An eerie green punch made with lime and ginger ale will enhance the festive vibe while providing a bubbly, refreshing drink option for all ages.
-
Savory Stuffed Mushrooms: Earthy mushrooms filled with garlic, herbs, and cheese provide a hearty bite that pairs incredibly well with the subtle flavors of your Halloween deviled eggs.
-
Creamy Tomato Basil Soup: This warm, comforting soup brings a rich and slightly acidic element that cuts through the creaminess of the eggs. Serve in shot glasses for a whimsical touch.
-
Chocolate Mousse Cups: End your meal on a sweet note with these rich and airy treats. Their silky texture is a perfect counterpart to the earthy flavors of the Swamp Eggs, leaving everyone satisfied.
-
Apple Cider Cocktail: A crunchy apple cider cocktail makes for an autumn-inspired drink that ties in beautifully with your Halloween theme, providing a balance of sweetness and spice.
-
Garlic Breadsticks: Their warm, buttery flavor is an inviting addition to your spread, and they’re perfect for dipping into that creamy filling left behind from the eggs.
How to Store and Freeze Halloween Deviled Eggs
Fridge: Store unfilled, dyed egg whites in an airtight container for up to 3 days. This keeps them fresh and ready for filling when you're closer to serving time.
Filled Eggs: Once filled, store Halloween Deviled Eggs in a covered dish in the fridge for up to 2 days. This will preserve the creaminess and vibrant look of the eggs.
Freezer: Do not freeze filled Halloween Deviled Eggs, as the texture may change. However, you can freeze the dyed egg whites for later use, thawing them in the fridge before filling.
Reheating: Serve your deviled eggs chilled for the best flavor. Enjoy these spooky delights cold to maintain their decorative appeal!
Halloween Deviled Eggs Variations
Feel free to unleash your creativity and customize these delightful deviled eggs to suit your taste!
-
Low-Carb: Swap out the mayonnaise for Greek yogurt for a lighter, protein-packed filling. It adds a tangy twist that complements the eggs beautifully.
-
Spicy Kick: Mix in a teaspoon of sriracha or your favorite hot sauce for a fiery flavor boost. This adds a fun surprise for those who crave a little heat!
-
Vegan-Friendly: Replace the eggs with silken tofu and blend it with vegan mayo. This option packs just as much flavor without the eggs, making it suitable for everyone at the table.
-
Herbed Delight: Experiment with different herbs by adding tarragon or cilantro, which can elevate your filling to a whole new level of freshness. Each herb brings its unique flair!
-
Creamy Avocado: For a unique twist, add mashed avocado to the filling instead of mayo. This gives a cool, buttery texture and a hint of richness that your guests will adore.
-
Cheesy Heaven: Stir in some finely grated cheddar or feta cheese to the filling for an extra creamy and cheesy layer of flavor that pairs perfectly with the fresh herbs.
-
Crunchy Add-Ins: Toss in finely chopped pickles or capers for a delightful crunch and a tangy bite. This brings a delightful texture contrast that elevates the dish.
-
Sweet Surprise: Drizzle in a touch of honey or maple syrup for a sweet contrast to the salty and savory flavors, creating an unexpected taste sensation that pairs beautifully with the eggs!
These variations not only cater to your preferences but also keep the festive spirit alive. And should you want to serve something equally as delightful, consider pairing these spooky treats with a side of creepy spider cupcakes or some eerie pumpkin soup for a complete Halloween feast! Enjoy the creative process!
Make Ahead Options
These Halloween Deviled Eggs are perfect for busy cooks looking to save time during festive preparations! You can hard-boil the eggs and dye them up to 24 hours in advance, allowing the vivid colors to set perfectly. Just refrigerate the dyed eggs in their shells. When you're ready to serve, simply peel the eggs and prepare the filling according to the recipe, mixing the yolks with mayonnaise, chlorophyll, and seasonings. To maintain quality, keep the filling separate until you’re about to fill the egg whites, which ensures the shells stay fresh and the flavors pop. You'll end up with stunning, spooktacular deviled eggs with minimal effort on the day of your celebration!
Swamp Eggs - Naturally Dyed Spooky Halloween Deviled Eggs Recipe FAQs
How do I choose the right eggs for my Halloween Deviled Eggs?
Absolutely! When selecting eggs, it's best to go for large, fresh eggs. Fresh eggs have a firmer white and will look more vibrant when filled and displayed. Look for eggs that are clean and free of any cracks or dark spots; this keeps your eggs both safe and beautiful for your spooky celebration.
How should I store my Halloween Deviled Eggs?
I often store unfilled, dyed egg whites in an airtight container in the refrigerator, which keeps them fresh for up to 3 days. If you've already filled them, keep your decorated deviled eggs n a covered dish; they'll stay delicious for up to 2 days in the fridge. Enjoy them chilled for the best taste!
Can I freeze Halloween Deviled Eggs?
While filled Halloween Deviled Eggs don't freeze well due to texture changes, you can definitely freeze just the dyed egg whites. To do this, place your unfilled egg whites in a single layer on a baking sheet to freeze. Once solid, transfer them to an airtight container. They can be frozen for up to 3 months; just remember to thaw them in the fridge before filling.
What if I over-soaked the eggs in the dye?
Very common! If you soak your eggs for too long, they may develop an overly bold color or even a mushy texture. If you've accidentally done this, simply rinse them under cool water to lighten the color a bit. This also helps to maintain the structural integrity of the shell for the spooky effect!
Are there any dietary considerations I should keep in mind?
Absolutely! These Halloween Deviled Eggs are vegetarian-friendly since they contain no meat. However, if you have guests with allergies or dietary restrictions, be mindful of the mayonnaise and the other ingredients, such as garlic. You can customize the filling using alternatives like vegan mayo for a plant-based option or omit garlic for milder flavors.
Spooktacular Halloween Deviled Eggs with a Colorful Twist
Equipment
- pot
- Bowl
- Mixing bowl
- Spoon
- Piping Bag
Ingredients
For the Eggs
- 12 large eggs Choose large eggs for the perfect size to showcase your colorful filling.
For the Blueberry Dye
- 1.5 cups frozen blueberries thawed
- 1.5 cups hot water Helps extract color from the blueberries.
- 3 tablespoons distilled white vinegar Enhances the dye's effectiveness.
For the Filling
- 12 large egg yolks Use yolks from the dyed eggs.
- 9 tablespoons mayonnaise Adds creaminess.
- 2 tablespoons liquid chlorophyll Infuses healthiness and color.
- 0.25 teaspoon salt
- 0.25 teaspoon black pepper
- 3 tablespoons minced fresh dill
- 2 tablespoons minced fresh chives
- 1 large clove garlic crushed
For Garnish
- 0.5 tablespoon poppy seeds For a finishing touch.
Instructions
Step-by-Step Instructions
- Hard-Boil the Eggs: Place 12 large eggs in a pot, cover with water, bring to boil, cover, reduce heat, and cook for 12 minutes. Transfer to an ice bath for 10-15 minutes.
- Prepare the Blueberry Dye: Combine 1.5 cups of thawed blueberries, 1.5 cups of hot water, and 3 tablespoons of distilled white vinegar in a bowl. Stir and let infuse.
- Create the Crackled Effect: Gently tap each hard-boiled egg on a hard surface to create fine cracks without breaking the shell.
- Dye the Eggs: Submerge the cracked eggs in the blueberry dye mixture for at least 1 hour to achieve desired color intensity.
- Peel the Eggs: Remove the eggs from the dye and peel under cool running water, revealing the crackled design.
- Prepare the Filling: Mix the yolks, mayonnaise, liquid chlorophyll, salt, black pepper, dill, chives, and crushed garlic until smooth and creamy.
- Fill the Egg Whites: Carefully fill each cracked egg white with the yolk mixture.
- Garnish and Serve: Sprinkle poppy seeds over each filled egg and serve on a festive platter.


Leave a Reply