
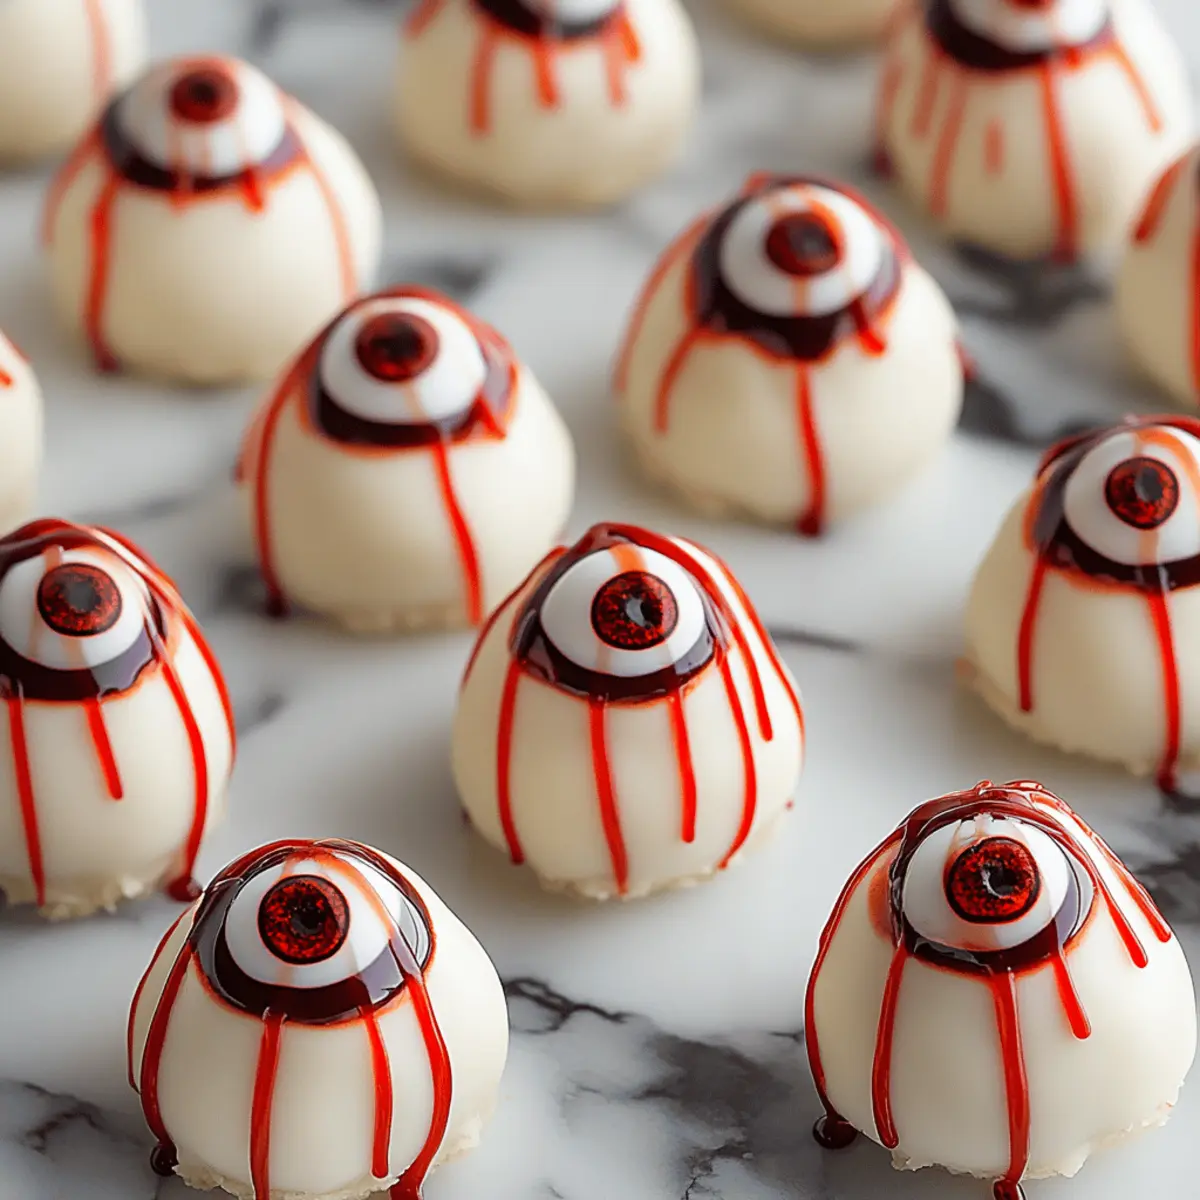
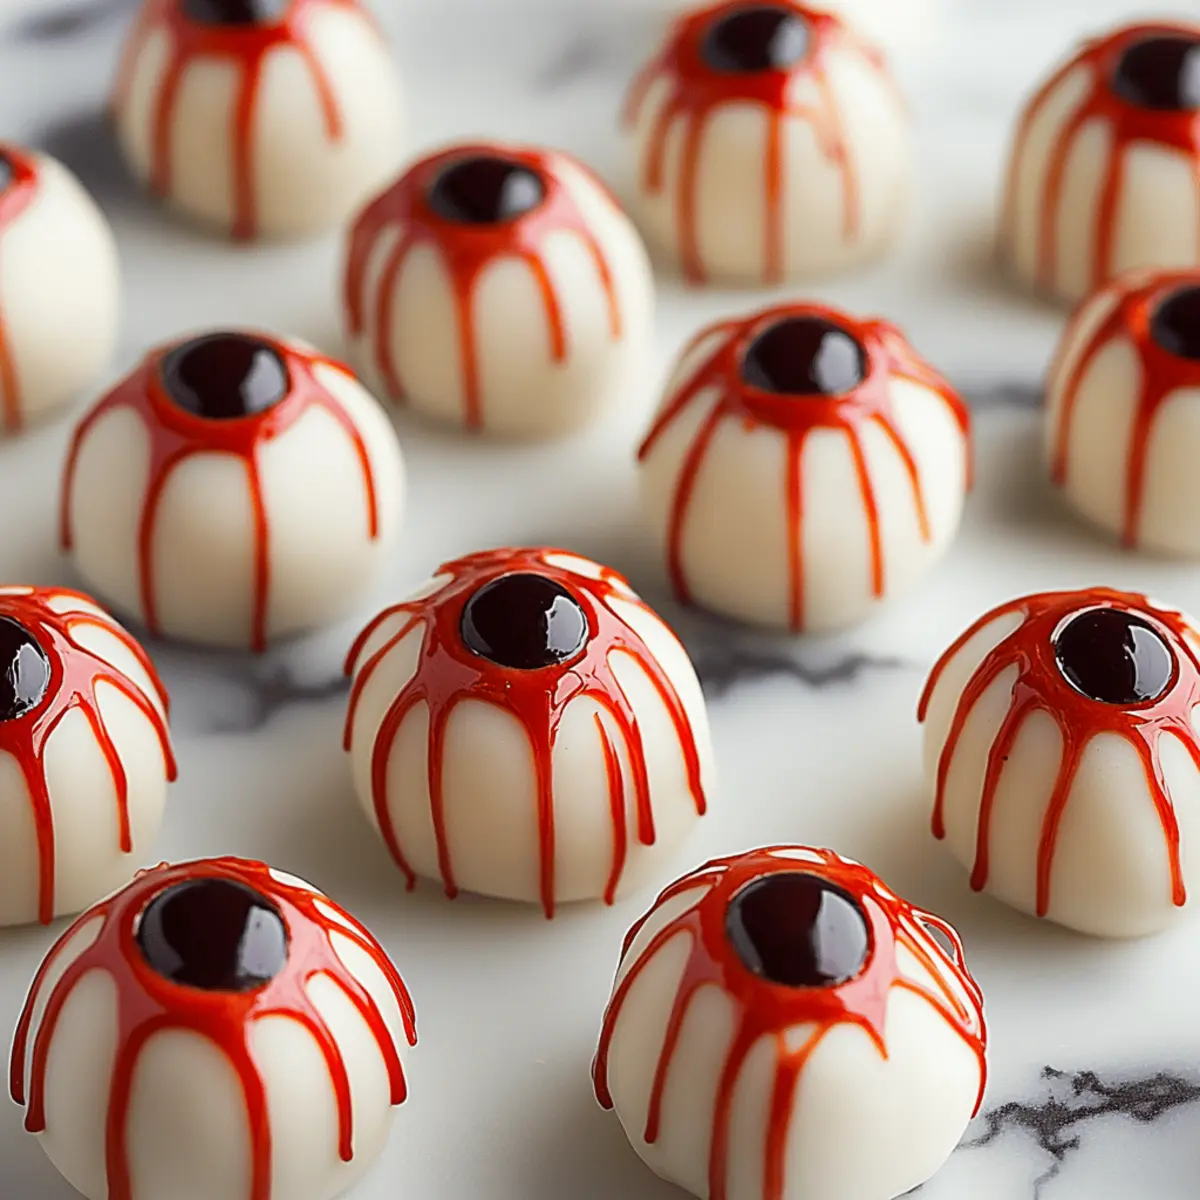
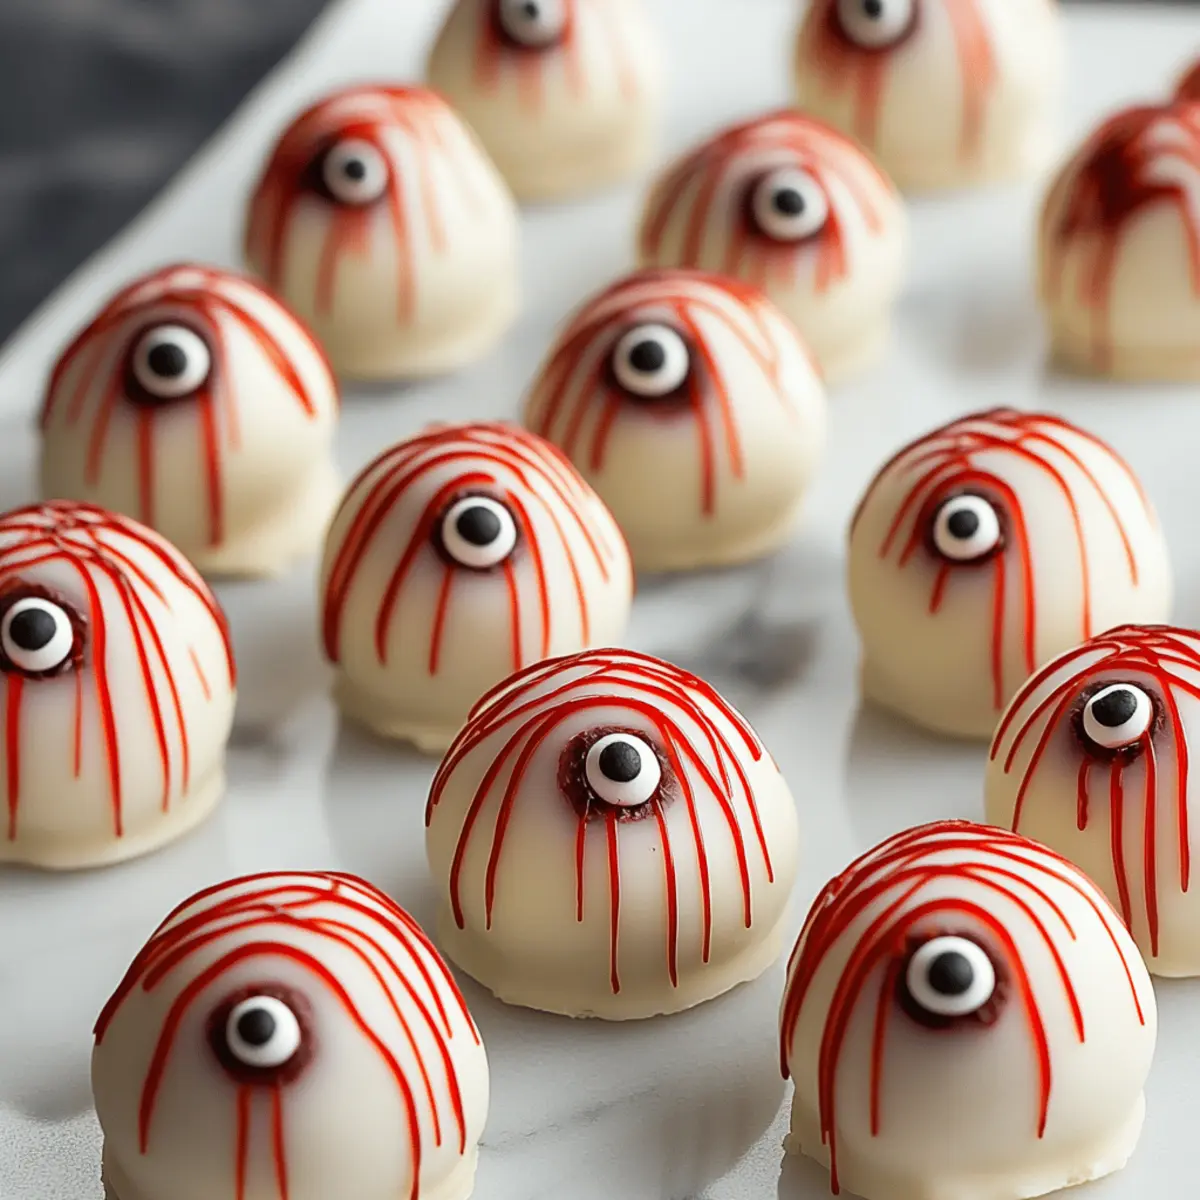
As I rummaged through my cabinet the other day, I stumbled upon a half-empty bag of Halloween M&Ms and a tub of white chocolate chips. It was a delightful mini crisis, waking my inner baker and igniting a creative spark. This inspired me to whip up some Spooky Eyeball Truffles that are perfect for the season! Not only are these cookies a fun, festive way to celebrate Halloween, but they’re also a quick treat, allowing you to satisfy your sweet tooth in under 30 minutes. Plus, they make for an adorable centerpiece at any spooky gathering! Enlist kids to help decorate with candy eyeballs for a truly interactive experience. Curious about how to make cookies that are as playful as they are delicious? Keep scrolling!
Why Are These Cookies So Special?
Halloween magic comes alive in every bite of these spooky cookies! Rich flavors from dark cocoa and white chocolate create a delicious contrast that’s irresistible. Quick and easy, with just 15 minutes of prep time, they fit perfectly in your busy schedule. Kid-friendly fun awaits as little hands help decorate with playful candy eyeballs. Looking for a Halloween treat that’s both delicious and eye-catching? Check out my Mummy Brownies Spooky for more festive inspiration!
Spooky Eyeball Cookie Ingredients
For the Dough
- Unsalted butter – ½ cup (113 grams) at cool room temperature adds richness and helps achieve a soft texture.
- Granulated sugar – ½ cup (100 grams) sweetens the cookies and helps them spread perfectly.
- Brown sugar – ¼ cup (50 grams) enhances moisture and adds a hint of caramel flavor.
- Vanilla extract – 1 teaspoon brightens the overall taste profile with its warm notes.
- Egg – 1 at room temperature binds the ingredients and contributes to a delightful chewiness.
- All-purpose flour – 1 cup (127 grams) forms the base of the cookie structure.
- Black cocoa powder – ½ cup (43 grams), sifted, brings a deep, rich flavor that's perfect for Halloween vibes.
- Cornstarch – 1 tablespoon helps achieve a soft and tender texture in your cookies.
- Fine sea salt – 1 teaspoon balances the sweetness for a well-rounded flavor.
- Baking soda – ½ teaspoon promotes a soft and chewy texture.
- Baking powder – ¼ teaspoon helps the cookies rise just right.
For the Mix-ins
- White chocolate chips – ½ cup (85 grams), plus more for garnish, add creamy sweetness that contrasts beautifully with the dark cocoa.
- Halloween M&Ms – 1 cup (218 grams), plus more for garnish, bring a festive crunch and color to each cookie.
- Candy eyeballs – a fun garnish to give your cookies a spooky, playful appearance and are perfect for Halloween!
These Spooky Eyeball Cookies are sure to be a hit at your Halloween gathering!
Step‑by‑Step Instructions for Spooky Eyeball Cookies
Step 1: Preheat and Prepare
Begin by preheating your oven to 350 degrees F (175 degrees C). While the oven heats up, line two baking sheets with parchment paper to prevent sticking. This is a crucial step to ensure your Spooky Eyeball Cookies come out effortlessly, retaining their adorable shape.
Step 2: Cream the Butter and Sugars
In the bowl of a stand mixer fitted with the paddle attachment, beat the cool room temperature unsalted butter, granulated sugar, and brown sugar together on medium speed until light and fluffy, about 3 minutes. Scrape down the sides of the bowl before adding in the vanilla extract and egg, mixing well until fully combined and smooth.
Step 3: Combine Dry Ingredients
In a separate bowl, whisk together the all-purpose flour, black cocoa powder, cornstarch, fine sea salt, baking soda, and baking powder. This step is essential for evenly distributing the leavening agents and cocoa powder, ensuring that every bite of your Spooky Eyeball Cookies has balanced flavors and a delightful texture as they bake.
Step 4: Form the Cookie Dough
Gradually add the dry ingredient mixture to the wet mixture in the stand mixer, mixing until a slightly sticky dough forms. Make sure not to over-mix; the dough should just come together. Then, gently fold in the white chocolate chips and Halloween M&Ms with a rubber spatula, allowing the colors and flavors to mix beautifully.
Step 5: Drop the Dough
Using a large spring-loaded cookie scoop, drop 3-tablespoon sized balls of dough onto the prepared baking sheets, spacing them at least 2 inches apart. This will let your cookies expand while baking without merging. For that extra festive touch, dot each ball of dough with additional white chocolate chips, M&Ms, and candy eyeballs before heading to the oven.
Step 6: Bake and Cool
Place the baking sheets in the preheated oven and bake for about 12 minutes. You’ll know they’re ready when the cookies are puffy but still soft in the center. Keep a close eye to avoid overbaking. Once baked, allow the cookies to cool on the baking sheet for 5 minutes before transferring them to a wire rack to cool completely and maintain that perfect texture.
Expert Tips for Spooky Eyeball Cookies
-
Room Temperature Ingredients: Ensure your butter and egg are at room temperature to create a smooth, homogenous dough that bakes evenly.
-
Don’t Overmix: When combining the dry and wet ingredients, mix just until combined. Overmixing can lead to tough cookies instead of the warm, soft texture you desire in your Spooky Eyeball Cookies.
-
Proper Spacing: Space your cookie dough balls at least 2 inches apart on the baking sheet. This prevents them from merging together as they spread during baking.
-
Watch the Bake Time: Keep an eye on your cookies as they bake. They should be puffy and soft in the center—overbaking them will lead to tough cookies.
-
Chill for Extra Chewiness: For added texture, consider chilling the dough for 30 minutes before scooping and baking. This helps prevent spreading and enhances the chewiness of your Spooky Eyeball Cookies.
-
Garnish Creatively: Don’t shy away from being generous with your toppings! Adding extra white chocolate chips, M&Ms, and candy eyeballs creates a fun and festive look while enhancing the flavor.
Spooky Eyeball Cookie Variations
Feel free to get creative with these delightful cookies; enhancing flavor or altering textures can add unexpected surprises!
-
Gluten-Free: Use a gluten-free flour blend instead of all-purpose flour for a safe twist. Your cookies will still be just as scrumptious!
-
Dairy-Free: Swap the unsalted butter for a plant-based butter and use dairy-free chocolate chips. Enjoy a rich flavor that anyone can indulge in!
-
Nutty Delight: Add chopped nuts like walnuts or pecans for a delightful crunch. This twist brings both texture and flavor to each bite.
-
Spicy Kick: Mix in a pinch of cayenne pepper or cinnamon for a surprising warmth. It’s a fun way to play with flavors and intrigue your taste buds!
-
Mini Monsters: Shape the dough into smaller balls for bite-sized cookies. Perfect for little hands and fun to pop in your mouth!
-
Extra Crunch: Roll the cookie dough in crushed Halloween candy before baking for an exciting outer texture. The added sweetness will enchant every trick-or-treater!
-
Swirled Surprise: Incorporate different flavored chocolate (like peanut butter or caramel) chips into the dough for a delightful surprise in every mouthful.
-
Themed Sprinkles: Use seasonal sprinkles for festive flair to complement the candy eyeballs. These little decorations can add an extra touch of holiday spirit!
Discover more spooky treats to thrill your guests, like my Mummy Brownies Spooky that are sure to enchant at your next gathering! 🧡
What to Serve with Halloween Cookies
Sipping cider, laughter, and spooky treats come together to make your Halloween celebration truly enchanting.
-
Hot Apple Cider: The warm, spiced notes complement the sweet treat, creating a cozy atmosphere.
-
Ghostly Marshmallow Fluff Dip: This fluffy dip pairs beautifully with your Halloween cookies for extra indulgence, adding a creamy texture and fun presentation.
-
Pumpkin Spice Ice Cream: The rich pumpkin flavor enhances the spooky sweetness of your cookies, making every bite a seasonal delight. It’s a delightful contrast of temperatures, too!
-
Chocolate Milk: A childhood favorite that brings nostalgia, its creaminess harmonizes with the chocolatey goodness of the cookies. Perfect for all ages!
-
Fresh Fruit Platter: Crisp, seasonal fruits like apples and pears offer a refreshing contrast to the sweetness of the cookies, brightening up your dessert table.
-
Monster Fruit Kabobs: Skewers of fruits dressed up as monsters provide a fun and nutritious option that kids will love to help make.
-
Spooky Eyeball Truffles: For a dessert duo, these playful truffles echo the festive spirit with rich flavors that enchant your guests.
-
Ghostly Lemonade: A bubbly drink with a lemon twist adds a zesty note and a spooky flair to your gathering.
-
Chocolate Covered Pretzels: The salty-sweet combo adds a crunchy texture that balances the soft Halloween cookies, enhancing the overall taste experience.
How to Store and Freeze Spooky Eyeball Cookies
Room Temperature: Keep your Spooky Eyeball Cookies in an airtight container at room temperature for up to 3 days to maintain their soft texture and vibrant flavors.
Fridge: If you prefer even longer shelf life, store them in the fridge for up to a week, using wax paper between layers to prevent sticking.
Freezer: For extended storage, freeze the cookies for up to 3 months. Place them in a single layer on a baking sheet until firm, then transfer to a freezer-safe bag, removing as much air as possible.
Reheating: To enjoy a fresh-out-of-the-oven experience, microwave frozen cookies for about 10-15 seconds or bake them straight from the freezer at 350°F (175°C) for 5-7 minutes.
Make Ahead Options
These Spooky Eyeball Cookies are perfect for meal prep, allowing you to enjoy Halloween festivities without the last-minute rush! You can prepare the dough up to 24 hours in advance; simply wrap it tightly in plastic wrap after mixing, and refrigerate it to keep it fresh and avoid drying out. Additionally, you can also scoop the cookie dough balls onto baking sheets and freeze them for up to 3 months. When you’re ready to bake, just pop them straight into the oven without thawing. This method ensures your treats are just as delicious and fresh, with minimal effort on busy days. Keep the baking time the same, and enjoy your spooky creations!
Spooky Eyeball Cookies Recipe FAQs
How do I know if my ingredients are ripe or fresh?
Absolutely! Checking the freshness of your ingredients is key. For your butter, make sure it is at cool room temperature and has a pleasant creamy smell. Eggs should be fresh—look for ones that are within the sell-by date. For the Halloween M&Ms, check for vibrant colors without any dark spots and a smooth texture.
What’s the best way to store my cookies?
Very! To maintain the soft texture of your Spooky Eyeball Cookies, store them in an airtight container at room temperature for up to 3 days. If you want them to last longer, pop them in the fridge for up to a week. Just remember to place wax paper between layers to prevent sticking!
Can I freeze these cookies?
Absolutely! To freeze your cookies, first place them in a single layer on a baking sheet until they're firm. Then, transfer them to a freezer-safe bag, removing as much air as possible. They’ll keep well for up to 3 months. When you’re ready to enjoy them, just microwave for 10-15 seconds or bake at 350°F (175°C) for 5-7 minutes straight from the freezer.
What if my dough seems too sticky?
Not a problem! If your cookie dough is too sticky, it may be due to the temperature of your ingredients or a slight imbalance in the ratios. You can add an extra tablespoon of flour to dry it out a bit or refrigerate the dough for about 15-30 minutes to firm it up before scooping. This usually helps achieve the perfect consistency!
Are there any dietary considerations I should keep in mind?
Definitely! If you're baking for someone with allergies, make sure to inform them about the ingredients used. These Spooky Eyeball Cookies contain dairy from the butter and chocolate chips. If someone has a gluten allergy, consider using a gluten-free flour blend. Furthermore, the candy eyeballs may also contain allergens, so checking the packaging is essential.
Can I make these cookies without the M&Ms?
Of course! If you prefer a classic cookie, you can replace the M&Ms with additional white chocolate chips, chopped nuts, or even dried fruit for a delightful twist. The more the merrier when it comes to creativity in your cookie-making!

Spooky Eyeball Truffles to Thrill Your Halloween Treats
Equipment
- stand mixer
- parchment paper
- Cookie scoop
- Baking Sheets
Ingredients
Dough Ingredients
- ½ cup Unsalted butter at cool room temperature
- ½ cup Granulated sugar
- ¼ cup Brown sugar
- 1 teaspoon Vanilla extract
- 1 large Egg at room temperature
- 1 cup All-purpose flour
- ½ cup Black cocoa powder sifted
- 1 tablespoon Cornstarch
- 1 teaspoon Fine sea salt
- ½ teaspoon Baking soda
- ¼ teaspoon Baking powder
Mix-ins
- ½ cup White chocolate chips plus more for garnish
- 1 cup Halloween M&Ms plus more for garnish
- Candy eyeballs for decoration
Instructions
Step-by-Step Instructions
- Preheat your oven to 350°F (175°C) and line two baking sheets with parchment paper.
- Beat the cooled unsalted butter, granulated sugar, and brown sugar together until light and fluffy, about 3 minutes.
- Whisk together all-purpose flour, black cocoa powder, cornstarch, salt, baking soda, and baking powder in a separate bowl.
- Gradually add the dry ingredients to the wet mixture and mix until a slightly sticky dough forms, then fold in white chocolate chips and M&Ms.
- Using a cookie scoop, drop 3-tablespoon sized balls on the baking sheets, dot with extra toppings, and bake for about 12 minutes.
- Cool on the baking sheet for 5 minutes before transferring to a wire rack.


Leave a Reply