
As the days shorten and autumn chills begin to creep in, my kitchen transforms into a magical space filled with the scents of chocolate and spices. This Halloween, I'm conjuring up something truly special—Wicked Witch Hat Brownies. These enchanting treats are not only a delightful twist on traditional brownies but also a crowd-pleaser that combines fudgy goodness with whimsical charm. With just 50 minutes of your time, you'll whip up this easy, indulgent dessert that will have both kids and adults giggling with glee. So grab your mixing bowl and let’s create an irresistible Halloween dessert that’s guaranteed to cast a spell at your next gathering. Are you ready to embark on this sweet adventure?
Why are Wicked Witch Hat Brownies irresistible?
Irresistible Flavor: Each brownie is rich and fudgy, delivering pure chocolate bliss.
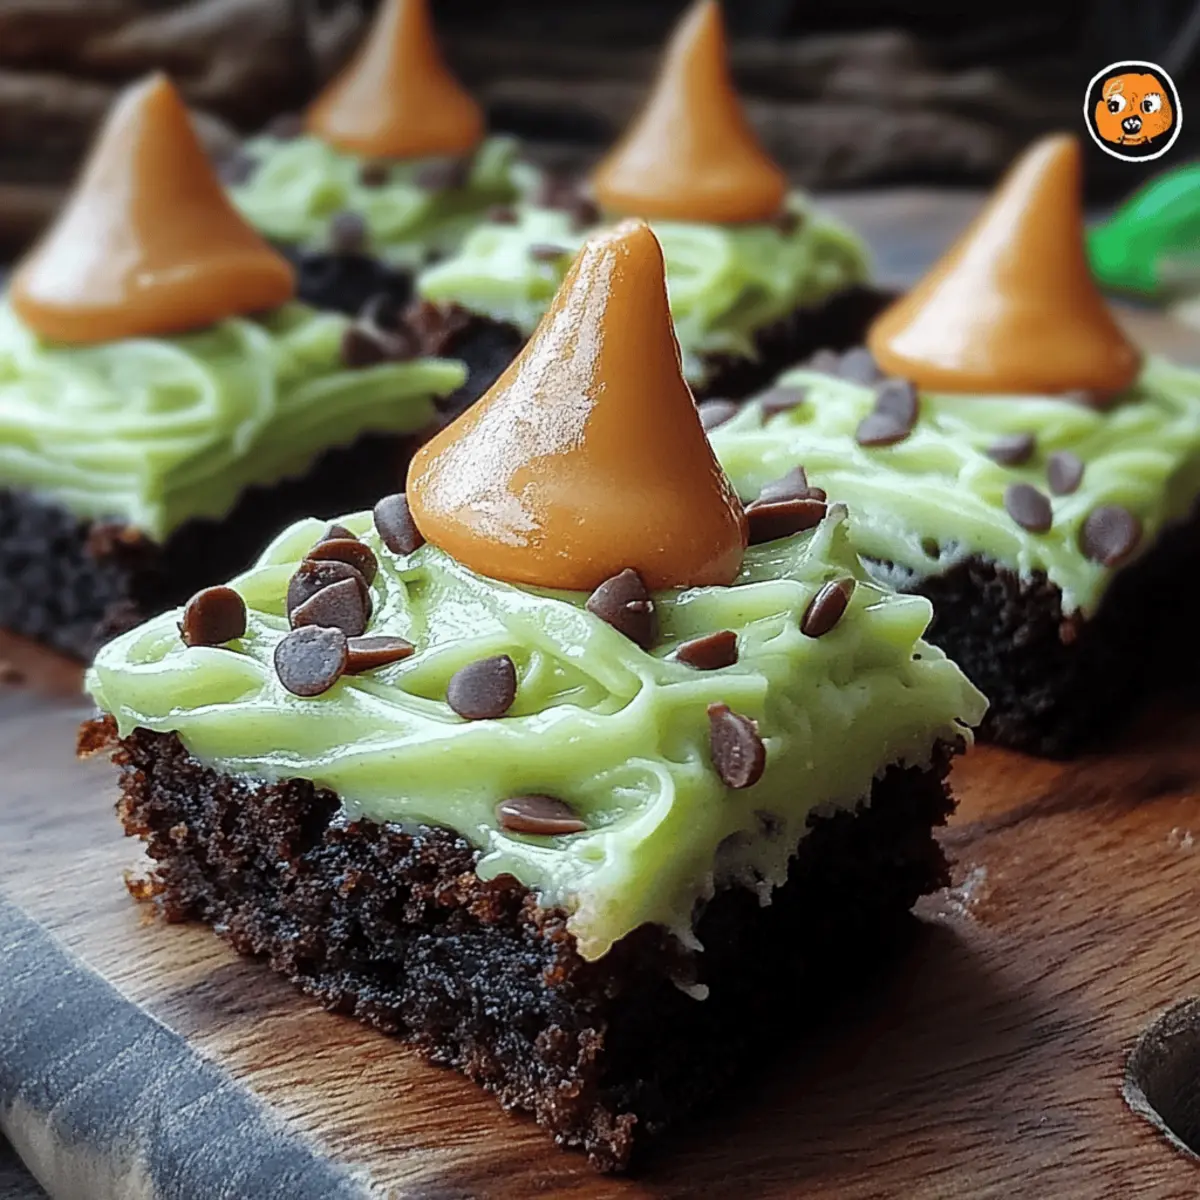
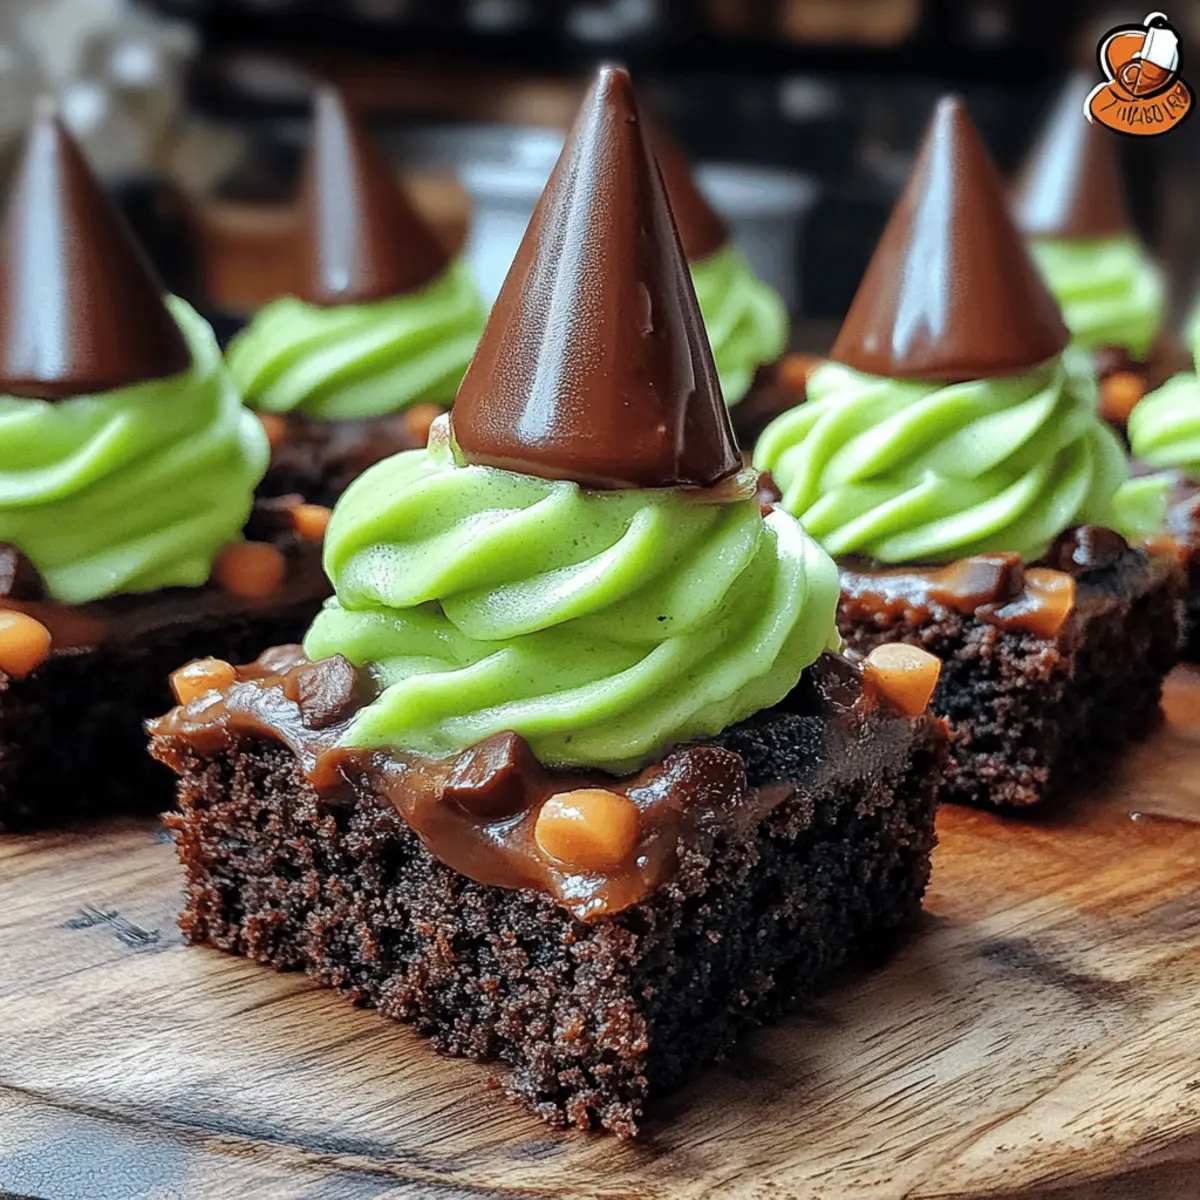
Whimsical Presentation: Topped with a chocolate cone and vibrant green frosting, they are as fun to look at as they are to eat!
Quick and Easy: With a total time of just 50 minutes, you can whip these up even on a busy day.
Perfect for Any Gathering: These magical treats are sure to impress at Halloween parties, school events, or a cozy family night in.
Crowd-Pleasing Delight: Kids and adults alike will adore this spooky twist on a beloved classic. Get ready to spread the joy with these charming Wicked Witch Hat Brownies!
Wicked Witch Hat Brownies Ingredients
For the Brownies
• Unsalted butter – 1 cup (225g); provides a rich and creamy base for that fudgy texture.
• Granulated sugar – 2 cups (400g); sweetens the brownies to perfection, creating a delightful contrast to the cocoa.
• Large eggs – 4; crucial for binding ingredients together, ensuring moistness in every bite.
• Vanilla extract – 1 teaspoon; adds a warm, aromatic flavor that enhances the chocolate.
• All-purpose flour – 1 cup (125g); gives structure to the brownies, keeping them tender and not too dense.
• Unsweetened cocoa powder – 1 cup (90g); infuses a deep chocolate flavor, vital for those craving a chocolate fix.
• Salt – ½ teaspoon; balances the sweetness and intensifies the chocolate flavor.
• Baking powder – ½ teaspoon; ensures the brownies rise, giving them a light, chewy texture.
For the Topping
• Chocolate ice cream cones – 12; these create the whimsical witch hats that are a signature of this dessert.
• Powdered sugar – 2 cups (300g); sweetens the frosting wonderfully, ensuring a smooth consistency.
• Milk – ¼ cup (60ml); helps achieve that perfect frosting texture while adding a creaminess.
• Vanilla extract (for frosting) – 1 teaspoon; infuses the frosting with a lovely sweet note.
• Green food coloring – to taste; gives the frosting its vibrant witchy hue that’s simply magical.
• Halloween-themed sprinkles – for garnish; these add a festive touch, making the brownies more appealing and fun.
Get ready to whip up these enchanting Wicked Witch Hat Brownies that are sure to delight everyone at your Halloween festivities!
Step‑by‑Step Instructions for Wicked Witch Hat Brownies
Step 1: Melt the Butter
Begin by melting 1 cup of unsalted butter in a medium saucepan over low heat, stirring gently until fully melted. Once melted, remove it from heat and let it cool for about 5 minutes. This will help prevent the eggs from cooking when added to the mix, ensuring your Wicked Witch Hat Brownies turn out perfectly fudgy.
Step 2: Combine Butter and Sugar
In a large mixing bowl, pour in the cooled melted butter and add 2 cups of granulated sugar. Using a whisk or an electric mixer, stir the mixture until it becomes smooth and creamy. This initial step lays the groundwork for the sweetness and texture of the brownies, making them irresistibly delicious.
Step 3: Add the Eggs and Vanilla
Next, crack 4 large eggs into the bowl, adding them one at a time while mixing thoroughly after each addition. Then, stir in 1 teaspoon of vanilla extract, ensuring all ingredients are well combined. The mixture should be glossy and thick, setting the stage for your rich, fudgy Wicked Witch Hat Brownies.
Step 4: Mix the Dry Ingredients
In a separate bowl, whisk together 1 cup of all-purpose flour, 1 cup of unsweetened cocoa powder, ½ teaspoon of salt, and ½ teaspoon of baking powder. This dry blend is essential for giving the brownies structure while enhancing their deep chocolate flavor. Gradually add this to the wet ingredients in batches for a smooth mix.
Step 5: Combine Wet and Dry Mixtures
Gently fold the dry mixture into the wet ingredients until just combined. Be careful not to overmix, as this can lead to tough brownies. The batter should be thick and luscious, signaling it's ready for the next stage as you prepare to pour it into your baking pan.
Step 6: Prepare the Baking Pan
Pour the brownie batter into a prepared 9x13 inch baking pan, using a spatula to spread it evenly. Preheat your oven to 350°F (175°C) while making sure the batter reaches all corners of the pan. This even distribution will ensure your Wicked Witch Hat Brownies bake uniformly, leading to an enticing final result.
Step 7: Bake the Brownies
Bake in the preheated oven for 25-30 minutes. Check for doneness by inserting a toothpick into the center; it should come out with a few moist crumbs attached. Once baked to perfection, remove the pan from the oven and allow the brownies to cool completely on a wire rack.
Step 8: Decorate the Ice Cream Cones
While the brownies cool, optionally dip the tops of 12 chocolate ice cream cones in melted chocolate. Immediately sprinkle them with Halloween-themed sprinkles for a festive touch. This whimsical decoration will bring a fun element to your Wicked Witch Hat Brownies, making them even more appealing.
Step 9: Prepare the Green Frosting
In a mixing bowl, combine 2 cups of powdered sugar, ¼ cup of milk, 1 teaspoon of vanilla extract, and a few drops of green food coloring. Whisk until you achieve a smooth and vibrant frosting consistency. This delightful green frosting will be the finishing touch to your brownies, adding that magical witchy flair.
Step 10: Frost the Brownies
Spread a generous layer of the green frosting over each brownie square once they are completely cooled. The frosting should be thick and vibrant, transforming your brownies into whimsical witches' hats that invite the first bite.
Step 11: Add the Ice Cream Cone Hats
Take the decorated chocolate ice cream cones and place them upside down on top of each frosted brownie. This gives the wow factor, turning the Wicked Witch Hat Brownies into a festive treat that captures the spirit of Halloween.
Step 12: Final Touch with Sprinkles
Finally, sprinkle Halloween-themed sprinkles around the brownies for an extra festive touch. This final step not only beautifies the plate but also adds a joyful crunch that complements the fudgy brownies beautifully, ensuring your spooky treats are ready to enchant everyone!
Make Ahead Options
These Wicked Witch Hat Brownies are perfect for meal prep and can be made in advance to save time on your spooky baking day! You can prepare the brownie batter and store it in the refrigerator for up to 24 hours before baking—just bring it to room temperature while preheating the oven. Additionally, you can bake the brownies up to 3 days ahead, allowing them to cool completely and then refrigerating them in an airtight container to keep them just as delicious. When you're ready to serve, simply frost with the green icing, add the ice cream cone hats, and sprinkles for a magical presentation. With these make-ahead tips, your Halloween festivities will be a breeze!
Expert Tips for Wicked Witch Hat Brownies
Use Room Temperature Eggs: Keep your eggs at room temperature for better mixing. This helps ensure a smoother brownie batter and a more even texture.
Don’t Overmix: When combining your wet and dry ingredients, mix until just incorporated to avoid tough brownies. A few flour streaks are okay; it will bake beautifully!
Check for Doneness: Insert a toothpick into the center of the brownies; it should come out with a few moist crumbs, indicating a fudgy texture that’s perfect for Wicked Witch Hat Brownies.
Cool Completely: Allow the brownies to cool completely before frosting. This prevents the frosting from melting and ensures a lovely, layered look.
Experiment with Toppings: Feel free to get creative with your Halloween-themed sprinkles! Adding candy eyes or edible glitter can make your Wicked Witch Hat Brownies even more magical.
How to Store and Freeze Wicked Witch Hat Brownies
Room Temperature: Store brownies in an airtight container at room temperature for up to 3 days for the best texture and flavor.
Fridge: For longer freshness, keep the brownies in the refrigerator in an airtight container for up to a week. Just bring them to room temperature before serving.
Freezer: You can freeze Wicked Witch Hat Brownies for up to 3 months. Wrap individual brownies in plastic wrap, then place them in a freezer bag to prevent freezer burn.
Reheating: To enjoy frozen brownies, thaw them overnight in the fridge, then bring to room temperature before serving, or heat briefly in the microwave for a warm treat!
What to Serve with Wicked Witch Hat Brownies?
Looking to create an enchanting feast alongside your spooky treats? Let’s make your Halloween gathering extra special!
-
Creamy Vanilla Ice Cream: A scoop of rich, creamy vanilla ice cream perfectly balances the fudgy sweetness of the brownies; plus, it's a classic!
-
Pumpkin Spice Latte: This warm, spiced drink complements the chocolaty goodness elegantly, adding a cozy autumnal touch to your dessert table.
-
Chocolate Dipped Strawberries: The juicy sweetness of strawberries dipped in chocolate creates a delightful contrast, offering a fresh component to your Halloween spread.
-
Caramel Sauce Drizzle: Drizzling warm caramel over your brownies adds a decadent richness, enhancing their flavor and creating a visually stunning dessert.
-
Spooky Fruit Salad: Combine seasonal fruits like oranges, apples, and berries into a vibrant, colorful salad to provide a refreshing counterbalance to the brownies.
-
Witch’s Brew Punch: Create a fun Halloween-inspired punch with grape juice, lemon-lime soda, and gummy worms. It's a whimsical drink that makes everyone smile!
-
Ghostly Meringue Cookies: Light and airy meringue cookies shaped like ghosts provide a delightful crunch, rounding out the meal with a playful twist.
-
Hot Chocolate Bar: Set up a hot chocolate station with toppings like whipped cream, marshmallows, and sprinkles, inviting guests to customize their warm beverages.
-
Mummy Dogs: These spooky, savory treats made by wrapping hot dogs in crescent roll dough add a fun, savory contrast that will have everyone coming back for more!
Elevate your Halloween festivities with these delightful pairings—each offering flavors and textures that will leave your guests under your spell!
Wicked Witch Hat Brownies: Delicious Twists
Feel free to personalize your spooky treats and make them truly your own—let your creativity shine through with these fun ideas!
-
Gluten-Free: Substitute all-purpose flour with a 1:1 gluten-free baking blend for delicious brownies everyone can enjoy! The taste will remain rich and fudgy, making it hard to believe they’re gluten-free.
-
Nutty Crunch: Add 1 cup of chopped walnuts or pecans to the brownie batter for added texture. The nutty flavor contrasts beautifully with the sweetness, while adding a delightful crunch.
-
Minty Fresh: Include 1 teaspoon of peppermint extract in the batter or frosting for a fun mint twist. It’s a refreshing addition that complements the rich chocolate flavor perfectly.
-
Spicy Heat: For a hint of warmth, add a pinch of cayenne pepper to the batter. It creates a surprising flavor profile that mingles beautifully with the chocolate. Just be cautious; a little goes a long way!
-
Vegan: Replace eggs with flax eggs (1 tablespoon ground flaxseed mixed with 2.5 tablespoons water per egg). Use coconut oil instead of butter for an equally delightful vegan treat!
-
Dark Chocolate: Use dark cocoa powder instead of regular unsweetened cocoa powder for a richer chocolate flavor. This will elevate the brownies to a gourmet level that chocolate lovers will adore.
-
Candy Corn Delight: Top your frosted brownies with candy corn for a classic Halloween touch. The added color and sweetness offer a delightful contrast to the rich, fudgy base.
-
Caramel Drizzle: Before frosting, swirl in some caramel sauce into the brownie mix for an extra gooey treat. The combination of chocolate and caramel is pure bliss!
In the spirit of creative cooking, don’t hesitate to check out my Tips for perfect brownies or discover how to store and freeze your treats to savor every delightful bite!
Wicked Witch Hat Brownies Recipe FAQs
How do I know if my ingredients, like eggs or butter, are fresh?
Absolutely! For the freshest taste, always use eggs that are at room temperature. Fresh eggs will sink in water, while old ones float. As for the butter, it should be a creamy yellow without any off-smells. If there are any dark spots or cracks, it's best to toss it!
What is the best way to store Wicked Witch Hat Brownies?
I recommend storing your brownies in an airtight container. Keep them at room temperature for up to 3 days for the perfect texture. If you want them to last longer, you can refrigerate them for up to a week; just bring them back to room temperature before serving.
Can I freeze Wicked Witch Hat Brownies for later?
Very! To freeze, wrap individual brownies tightly in plastic wrap, then place them in a freezer bag. They can be frozen for up to 3 months. When you're ready to enjoy, simply thaw them in the fridge overnight, and let them come to room temperature for the best taste.
What should I do if my brownies come out too crumbly?
If your brownies are crumbly, it might be due to overbaking or not enough binding ingredients. Make sure to check for doneness at the 25-minute mark. If baking again, add an extra egg or a little more melted butter next time to enhance moisture.
Are Wicked Witch Hat Brownies suitable for people with allergies?
Definitely! However, these brownies contain butter and eggs, which can be allergenic. For dairy-free alternatives, you can substitute unsalted butter with coconut oil and use flax eggs as a binder. Always double-check with guests to ensure everyone can enjoy this delicious treat!
How can I enhance the flavor of my brownies?
To amp up the flavor, consider adding a pinch of espresso powder or a teaspoon of instant coffee granules into the batter. Chocolate and coffee are a divine combo! Also, you might explore adding a touch of peppermint or orange zest for a fun twist.
Wicked Witch Hat Brownies: A Spooktacular Treat Adventure
Equipment
- Medium saucepan
- large mixing bowl
- Whisk or electric mixer
- Measuring Cups
- Measuring Spoons
- 9x13-inch baking pan
- Spatula
- wire rack
Ingredients
For the Brownies
- 1 cup unsalted butter provides a rich and creamy base for that fudgy texture.
- 2 cups granulated sugar sweetens the brownies to perfection.
- 4 large eggs crucial for binding ingredients together.
- 1 teaspoon vanilla extract adds a warm, aromatic flavor.
- 1 cup all-purpose flour gives structure to the brownies.
- 1 cup unsweetened cocoa powder infuses a deep chocolate flavor.
- ½ teaspoon salt balances the sweetness.
- ½ teaspoon baking powder ensures the brownies rise.
For the Topping
- 12 chocolate ice cream cones creates the whimsical witch hats.
- 2 cups powdered sugar sweetens the frosting.
- ¼ cup milk helps achieve the perfect frosting texture.
- 1 teaspoon vanilla extract (for frosting) infuses the frosting with sweetness.
- green food coloring gives the frosting its vibrant hue.
- Halloween-themed sprinkles adds a festive touch.
Instructions
Step-by-Step Instructions
- Begin by melting 1 cup of unsalted butter in a medium saucepan over low heat, stirring gently until fully melted. Remove from heat and let cool for about 5 minutes.
- In a large mixing bowl, pour in the cooled melted butter and add 2 cups of granulated sugar. Stir until smooth and creamy.
- Crack 4 large eggs into the bowl, adding them one at a time while mixing thoroughly after each addition. Stir in 1 teaspoon of vanilla extract.
- In a separate bowl, whisk together 1 cup of all-purpose flour, 1 cup of unsweetened cocoa powder, ½ teaspoon of salt, and ½ teaspoon of baking powder.
- Gradually add the dry mixture to the wet ingredients, folding gently until just combined.
- Pour the brownie batter into a prepared 9x13 inch baking pan and spread it evenly. Preheat your oven to 350°F (175°C).
- Bake in the preheated oven for 25-30 minutes. Check for doneness with a toothpick; it should come out with a few moist crumbs.
- Allow the brownies to cool completely on a wire rack.
- Dip the tops of 12 chocolate ice cream cones in melted chocolate and sprinkle with Halloween-themed sprinkles.
- In a bowl, combine 2 cups of powdered sugar, ¼ cup of milk, 1 teaspoon of vanilla extract, and green food coloring. Whisk until smooth.
- Spread a generous layer of green frosting over each brownie square.
- Place the decorated chocolate ice cream cones upside down on top of each frosted brownie.
- Sprinkle Halloween-themed sprinkles around the brownies for an extra festive touch.
Leave a Reply