
As I stood in my kitchen, the sweet scent of strawberries filled the air, instantly lifting my spirits. That's the magic of these Strawberry Kiss Cookies—each bite is a delightful kiss of nostalgia that transforms any ordinary day into a celebration. This recipe is not just about deliciousness; it’s a quick triumph for busy home chefs who crave something homemade yet swift. With just fifteen minutes of prep and a handful of simple ingredients, you'll be whipping up a batch that’s perfect for sharing or savoring all by yourself. Plus, the charming touch of a Hershey’s Kiss on top adds a fun twist that’ll leave your loved ones asking for more. Are you ready to indulge in this delightful dessert that’s sure to steal hearts?

Why are Strawberry Kiss Cookies irresistible?
Quick and Easy: With just 15 minutes of prep, you can create a batch of these delicious cookies that are sure to impress your friends and family.
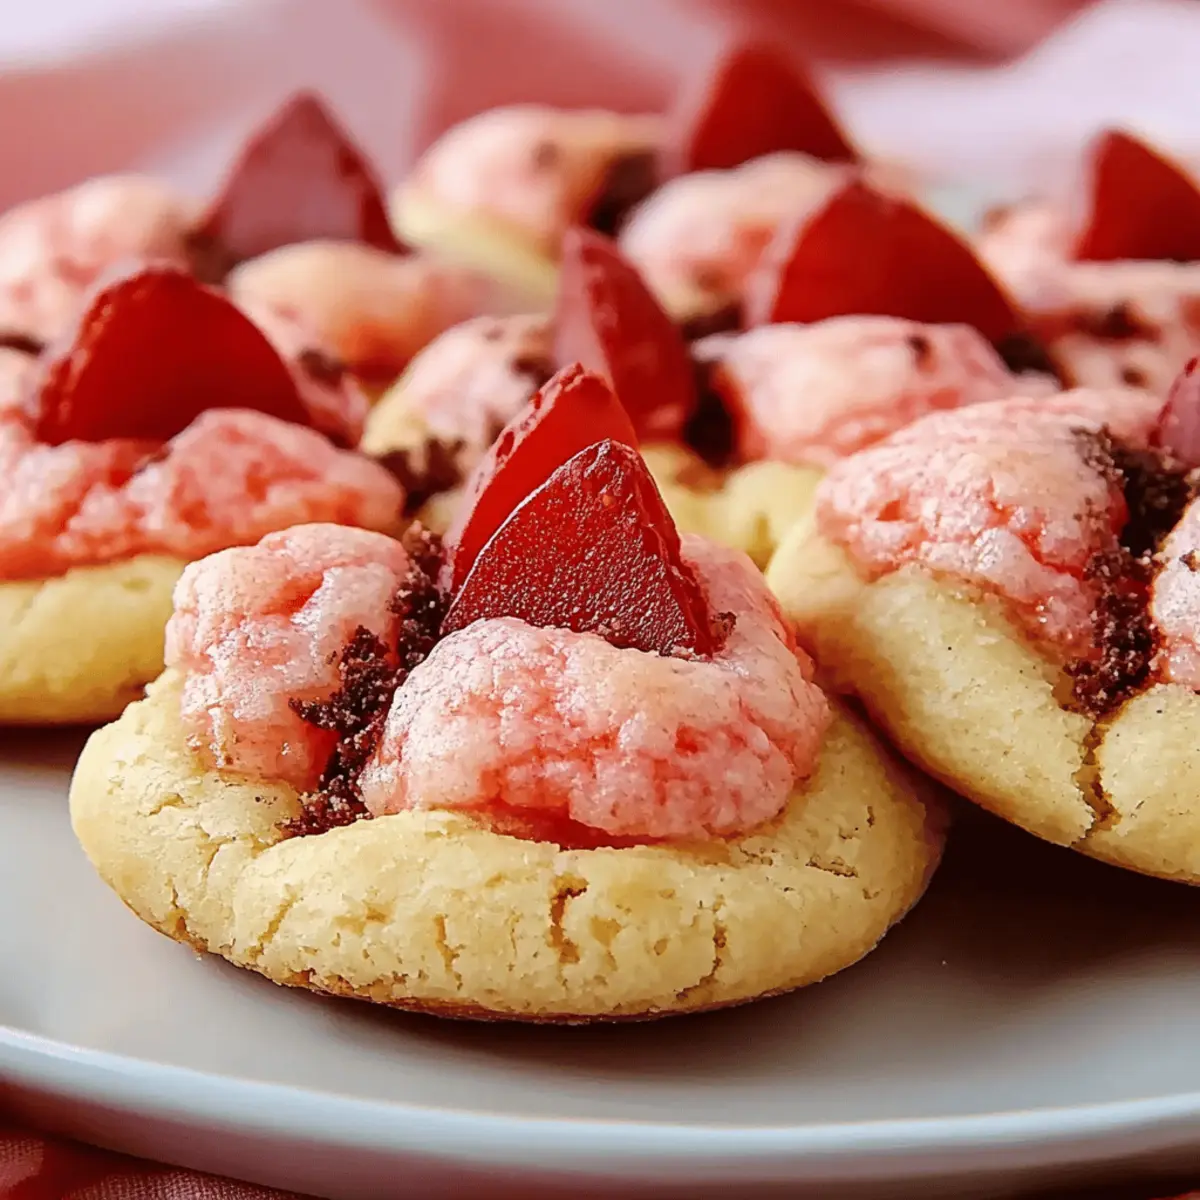
Festive Touch: The signature Hershey’s Kiss on top not only adds a whimsical look but also a burst of chocolate that pairs perfectly with strawberry.
Crowd-Pleaser: These cookies are a hit at any gathering, making them perfect for parties, holidays, or cozy nights in.
Versatile Base: Use the strawberry cake mix as a foundation, and feel free to experiment with other toppings or mix-ins to suit your taste!
Nostalgia in Every Bite: Each cookie captures the essence of childhood sweetness, appealing to both kids and adults, making them a nostalgic treat for everyone.
Strawberry Kiss Cookies Ingredients
For the Dough
- Vegetable oil – Adds moisture and gives a tender texture to your cookies.
- Large eggs – Acts as a binder to help the dough hold together.
- Flour – Provides structure; can swap with gluten-free flour for a lighter option.
- Strawberry cake mix – Infuses vibrant flavor and sweetness, making the base truly special.
- Milk – Helps achieve the right dough consistency; any milk type works!
For Rolling
- Granulated sugar – Coats the cookies to create a delightful crunch and sweetness.
For Topping
- Hershey’s Kisses – A chocolatey surprise that fondly completes your Strawberry Kiss Cookies.
Step‑by‑Step Instructions for Strawberry Kiss Cookies
Step 1: Mix the Wet Ingredients
In a large mixing bowl, combine ¼ cup of vegetable oil and 2 large eggs. Whisk them together until fully blended and smooth, about 2 minutes. This mixture will be the wet base for your Strawberry Kiss Cookies, giving them the moisture and richness they need.
Step 2: Incorporate Dry Ingredients
Gradually add 1 cup of flour and 1 (15.25 oz) package of strawberry cake mix to your wet ingredients. Using a spatula or wooden spoon, gently fold the dry ingredients in until they are just combined, taking care not to overmix. The dough will begin to take shape and look slightly thick.
Step 3: Add Milk for Consistency
Pour in 1 tablespoon of milk and mix until the dough fully comes together. This step is crucial for achieving the perfect consistency for your Strawberry Kiss Cookies, ensuring they bake up soft and chewy. You should end up with a thick, sticky dough that can be scooped but not runny.
Step 4: Scoop the Dough
Using a #30 cookie scoop or a heaping 2-tablespoon measurement, portion out the dough and roll it into balls with your hands. This should yield about 24 cookie balls. Place the dough balls on a parchment-lined baking sheet, making sure to leave enough space between each to allow for baking.
Step 5: Roll in Sugar
Roll each dough ball in a bowl of granulated sugar until fully coated. This will give your Strawberry Kiss Cookies a sweet, sparkling exterior once baked. After rolling, return them to the parchment-lined sheet, ready for chilling, which is vital for perfect texture.
Step 6: Chill the Dough
Cover the baking sheet with plastic wrap and chill the dough in the refrigerator for at least 1 hour. This resting time helps the flavors meld and gives the cookies a better structure while baking. You can use this time to prepare your oven and gather up your baking tools.
Step 7: Preheat the Oven
Once the dough has chilled, preheat your oven to 375ºF (190ºC). Line two cookie sheets with parchment paper to prevent sticking and make cleanup easy. This temperature will ensure your Strawberry Kiss Cookies bake evenly and become delightfully golden.
Step 8: Bake the Cookies
Place the first batch of cookie dough balls on the oven’s middle rack and bake for 8–10 minutes. Keep an eye on them and remove when the edges are slightly golden, and the centers are still soft. This will give your cookies that perfect chewy texture.
Step 9: Add Hershey’s Kisses
Immediately after removing the cookies from the oven, gently press a Hershey Kiss into the center of each warm cookie. The heat from the cookies will soften the chocolate, creating a deliciously melty topping that enhances your Strawberry Kiss Cookies delightfully.
Step 10: Cool and Store
Allow the cookies to cool completely on the baking sheet before transferring them to a wire rack. Once cooled, store your magical Strawberry Kiss Cookies in an airtight container to maintain their freshness. Perfect for sharing or savoring all on your own!
What to Serve with Strawberry Kiss Cookies
Indulging in these sweet, strawberry-infused treats is made even better when paired with the right accompaniments!
-
Fresh Berries: Juicy strawberries or mixed berries add a vibrant freshness that beautifully balances the sweetness of the cookies.
-
Vanilla Ice Cream: The creamy contrast of vanilla ice cream melts deliciously with warm cookies, creating a delightful dessert experience.
-
Chocolate Milkshake: Rich and creamy, a chocolate milkshake is a fun way to enhance the playful chocolate notes from the Hershey's Kisses.
-
Whipped Cream: Light and airy whipped cream can be dolloped on top of each cookie for an extra touch of indulgence.
-
Coffee or Tea: A warm cup of coffee or herbal tea brings a cozy, comforting element that compliments the strawberry flavors wonderfully.
-
Cream Cheese Frosting: Spread a thin layer of cream cheese frosting over the cookies for an added zing that elevates every bite.
-
Coconut Macaroons: For a tropical twist, pair your cookies with chewy coconut macaroons, which offer a delightful texture contrast.
These pairings will surely enhance your experience, turning a simple cookie into a memorable delight!
Expert Tips for Strawberry Kiss Cookies
-
Chill Time Matters: Ensure to chill the dough for at least 1 hour. This prevents excessive spreading during baking, keeping your Strawberry Kiss Cookies nice and thick.
-
Proper Measuring: Use a kitchen scale or carefully measure flour to avoid dense cookies. Too much flour can lead to dry, crumbly results, which we want to avoid.
-
Don’t Overmix: When combining ingredients, mix just until incorporated. Overmixing can create tough cookies, while gentle folding keeps them soft and chewy.
-
Warm Topping: Press Hershey Kisses into cookies right after they come out of the oven. This maximizes the melting effect and creates that delightful chocolate center!
-
Storage Tips: Keep your cookies in an airtight container at room temperature to maintain their texture. They can also be frozen for later enjoyment, just ensure they're layered with parchment paper!
How to Store and Freeze Strawberry Kiss Cookies
Room Temperature: Keep cookies in an airtight container at room temperature for up to 3 days to maintain their soft, chewy texture.
Fridge: If you prefer a longer shelf life, store them in the fridge for up to 1 week. Just ensure they are well-wrapped to prevent them from drying out.
Freezer: For extended storage, freeze your baked Strawberry Kiss Cookies in a single layer, separated by parchment paper, for up to 2 months. When ready to enjoy, simply thaw at room temperature.
Reheating: To bring back the cookie's fresh-baked warmth, reheat in the oven at 350ºF for about 5 minutes, allowing the Hershey Kisses to soften again.
Make Ahead Options
These Strawberry Kiss Cookies are perfect for meal prep enthusiasts! You can scoop and roll the cookie dough up to 24 hours in advance. Simply cover the chilled dough balls in plastic wrap and keep them in the refrigerator to maintain freshness. When you're ready to bake, preheat the oven and place the cookie balls directly on a parchment-lined sheet, baking them just as you normally would. For optimal quality, press the Hershey’s Kisses into the warm cookies right after they come out of the oven. This way, your homemade treats will still taste just as delicious, making them a fantastic time-saver on busy weeknights!
Strawberry Kiss Cookies Variations
Feel free to get creative! With a few simple tweaks, you can elevate these cookies into delightful new flavors.
-
Gluten-Free: Substitute the all-purpose flour with a 1:1 gluten-free flour blend. Your cookies will be just as delicious and safe for gluten-sensitive friends!
-
Nutty Delight: Add ½ cup of finely chopped nuts, like walnuts or pecans, to the dough for extra texture and flavor. The combination of strawberry and nuts creates a wonderful contrast that will surprise your taste buds.
-
Chocolate Lovers: Incorporate ½ cup of mini chocolate chips into the dough alongside the strawberry cake mix for added chocolate goodness. This combo delivers a double dose of sweetness that’s simply irresistible!
-
Berry Blast: Swap some of the strawberry cake mix for raspberry or blueberry cake mix to introduce different berry flavors. Mixing berries is a fun twist that keeps things exciting and fruity!
-
Spiced Warmth: Add 1 teaspoon of cinnamon or pumpkin spice to the dough for a warm, cozy touch. This is perfect for fall gatherings and adds a hint of warmth that complements strawberry beautifully.
-
Dairy-Free: Use almond milk or coconut milk instead of regular milk, and ensure your Hershey's Kisses are dairy-free. This makes your cookies accessible for dairy-sensitive people without sacrificing flavor.
-
Coconut Flare: Toss in ½ cup of shredded coconut to the dough for a tropical twist. This will not only bring a new flavor profile but also a delightful chewy texture.
-
Zesty Lemon: Add the zest of one lemon to the dough for a pop of citrusy brightness. The tanginess cuts through the sweetness, creating a refreshing balance perfect for springtime!
Don't hesitate to mix and match these ideas! The beauty of these Strawberry Kiss Cookies lies in their versatility, making them fun and exciting to share. And if you're in the mood to explore even more varieties, check out these delightful cookie recipes!

Strawberry Kiss Cookies Recipe FAQs
How do I choose ripe strawberries for my cookies?
Absolutely! When picking strawberries, look for bright red berries that are firm to the touch without any dark spots. They should have a sweet aroma, signaling ripeness. If you can find locally grown strawberries, those are often the best choice for optimal flavor!
What’s the best way to store Strawberry Kiss Cookies?
Store your Strawberry Kiss Cookies in an airtight container at room temperature for up to 3 days for the best texture. If you'd like to keep them longer, refrigerate them for up to 1 week. Just make sure they are well-wrapped to avoid drying out.
Can I freeze Strawberry Kiss Cookies?
Yes, you can freeze your cookies! Place your baked Strawberry Kiss Cookies in a single layer on a parchment-lined baking sheet and freeze for about 1 hour. Once frozen, transfer them to a freezer-safe container or zip-top bag with parchment paper between layers. They can be stored for up to 2 months. When you're ready to enjoy, simply thaw at room temperature or reheat in the oven at 350°F for about 5 minutes.
What should I do if my cookie dough is too sticky?
If your dough is sticky and hard to manage, try chilling it for a bit longer. Refrigerate the dough for an additional 15 to 20 minutes. This will firm it up and make it easier to scoop and roll in sugar. If it’s still too sticky, you can sprinkle in a little extra flour, but do it gradually to avoid making them too dense.
Are Strawberry Kiss Cookies safe for kids with allergies?
These cookies contain eggs, dairy (from the milk and Hershey's Kisses), and gluten (from flour), so they may not be suitable for individuals with allergies to these ingredients. For a gluten-free version, substitute all-purpose flour with a gluten-free blend that is designed for baking. Always check the packaging of your ingredients to ensure they are allergy-friendly as well.
What’s the tissue around the Hershey Kiss? Can I eat that?
The shiny foil wrapper around the Hershey's Kisses is designed for display and to protect the chocolate until you're ready to enjoy it. Remove the foil before pressing the Kiss into the cookie. Enjoy the chocolate piece, but don’t eat the wrapper!

Delicious Strawberry Kiss Cookies You Need to Try Today
Equipment
- Mixing bowl
- Spatula
- Cookie scoop
- Baking sheet
- parchment paper
- refrigerator
- Oven
Ingredients
For the Dough
- ¼ cup vegetable oil Adds moisture and tenderness
- 2 large eggs Acts as a binder
- 1 cup flour Provides structure
- 1 15.25 oz package strawberry cake mix Infuses flavor
- 1 tablespoon milk Helps achieve dough consistency
For Rolling
- ¼ cup granulated sugar Coats cookies for crunch
For Topping
- 24 pieces Hershey's Kisses Chocolatey surprise on top
Instructions
Step-by-Step Instructions
- In a large mixing bowl, combine ¼ cup of vegetable oil and 2 large eggs. Whisk until fully blended and smooth.
- Gradually add 1 cup of flour and 1 (15.25 oz) package of strawberry cake mix to the wet ingredients. Fold gently until just combined.
- Pour in 1 tablespoon of milk and mix until the dough comes together.
- Using a #30 cookie scoop or a heaping 2-tablespoon measurement, portion out the dough and roll into balls. Place on a parchment-lined baking sheet.
- Roll each ball in granulated sugar until fully coated. Return to the parchment-lined sheet.
- Cover with plastic wrap and chill the dough in the refrigerator for at least 1 hour.
- Preheat your oven to 375ºF (190ºC) and line two cookie sheets with parchment paper.
- Bake for 8–10 minutes until edges are slightly golden and centers are soft.
- Immediately press a Hershey Kiss into the center of each warm cookie.
- Allow cookies to cool completely on the baking sheet before transferring to a wire rack.


Leave a Reply